Manage alerts
This chapter presents the different methods to manage alerts.
Acknowledging a problem
Principle
When a host or a service has an incident and this incident is confirmed, the notification process is triggered. This can generate a notification sent to a contact. If the problem persists, and depending on the configuration produced (resend a notification at regular time intervals, escalation of notification, etc.), it is possible that other notifications will be sent.
The acknowledgment of an alert can be used to stop the notification process (sending of notifications) until the host or the service resumes its nominal status.
Example of use:
A service is in charge of checking the health of the hard disks in a disk array. A hard disk on a disk array goes down, and a notification is sent. The monitoring operator acknowledges the service, specifying that a team is in the process of dealing with the problem. Notifications are no longer sent. The service will return to its nominal state after a change of disk.
The acknowledgment of an alert means that a monitoring user has taken the problem into account - not that the incident has been corrected; this can only take effect when the check returns to its nominal state.
Practice
To acknowledge an incident, there are two solutions:
- From real time monitoring
- From the detailed sheet of an object
- Go into the Monitoring > Status Details > Hosts (or Services) menu
- Select the object(s) that you want acknowledge
- In the menu: More actions click Hosts: Acknowledge or Services: Acknowledge
From of the detail page of an object, click the icon |enabled| associated with the Acknowledged field in the Options frame
The following window appears:
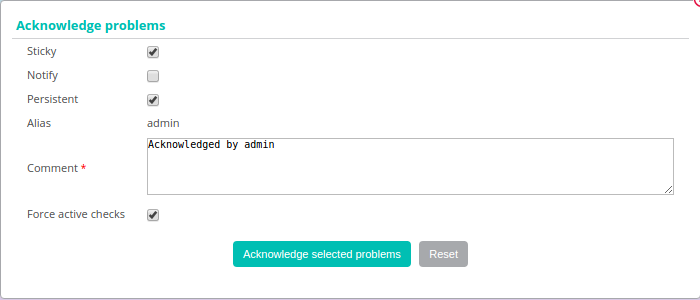
- If the Sticky box is checked, the acknowledgment will be maintained in case of a change of Not-OK status (e.g.: DOWN to UNREACHABLE or WARNING to CRITICAL). Otherwise, the acknowledgment disappears and the notification process is reactivated.
- If the Notify box is checked, a notification is sent to the contacts linked to the object to warn them that the incident on the resource has been acknowledged (if the contact possesses the activity acknowledgment notification filter).
- If the Persistent box is checked, the acknowledgment will be maintained in the case of a restart of the scheduler. Otherwise, the acknowledgment disappears and the notification process is reactivated.
- The Comment field is generally used to provide the reason for the acknowledgment. It is mandatory
- If the Acknowledge services attached to hosts box is checked, all the services linked to the host will be acknowledged (option visible only if we acknowledge a host).
- If the Force active checks box is checked, a command will be sent to the scheduler to recheck the resource as soon as possible.
To delete the acknowledgment of an incident on an object:
- Go into the Monitoring > Status Details > Hosts (or Services) menu
- Select the objects whose acknowledgment you want to delete.
- In the More actions menu, click Hosts: Disacknowledge or Services: Disacknowledge
Add downtime
Principle
Downtime is a period during which the notifications to a resource are disabled. Downtimes are used during a programmed maintenance operation. They save us from receiving false positive alerts.
It is important to select all the resources necessary to prevent false positives and false negatives. In addition, the time spent in this state is taken into account during the generation of the availability data.
There are two types of downtime:
- Fixed downtime: starts and stops at the planned time.
- Flexible downtime: starts during the planned time window as soon as an incident is detected and finishes when the planned time in seconds expires.
Practice
There are three different possibilities to define downtime:
- From the detail sheets of a host or of the service
- From the real-time monitoring interface
- From the Downtime menu
- From the detailed sheet of an object
- From real time monitoring
- From the Downtime menu
- Access the detail page of an object
- In the category: Commands, click Schedule downtime for this host/service
- Go into the Monitoring > Status Details > Hosts (or Services) menu
- Select the(s) object(s) on which you want to program downtime period
- In the More actions… menu, click Hosts: Set Downtime or Services: Set Downtime
- Go into the Monitoring > Downtimes > Downtimes menu
- Click Add a service downtime or Add a host downtime
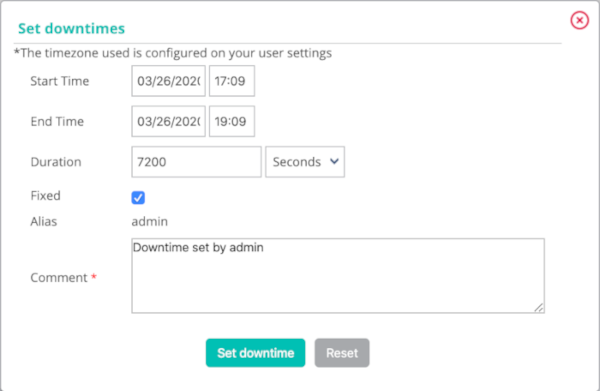
The following window appears:
- The Host Name field defines the host concerned by downtime
- The Service field defines the service concerned by downtime
- If the Fixed box is checked, the downtime period is fixed. Otherwise, it is flexible
- If the downtime period is flexible, the Duration field defines the length of the downtime
- The Start Time and End Time fields define the beginning and end date of the downtime period. Downtime cannot start or end after December 31, 2099, 11:59 pm.
- The Comments field can be used to indicate why downtime is defined.
Recurrent downtimes
Principle
Downtime is a period during which the notifications to a host or a service are disabled. Downtime periods are convenient during maintenance operations on a host or a service: they allow us to avoid receiving false positives.
Recurrent downtime periods are downtime periods that recur repetitively.
Example.: A backup of the virtual machines is performed every day from 8 PM to midnight. This type of backup has a tendency to saturate the CPU use of all the virtual machines. It is necessary to program recurrent downtime periods on the services concerned to avoid receiving notifications from 8 PM to midnight.
Downtime periods are taken into account in the calculation of the availability ratio of the resource in the availability report.
Practice
There are two types of downtime:
- The fixed downtime period: This means that the downtime period takes place during exactly the time period defined.
- The flexible downtime period: This means that if, during the time period defined, the service or the host returns a Not-OK status, the downtime period lasts a certain number of seconds (to be defined in the form) from the moment when the host or the status returns a Not-OK status.
To add a recurrent downtime period, go into the
Monitoring > Downtimes > Recurrent Downtimes menu and click
Add.
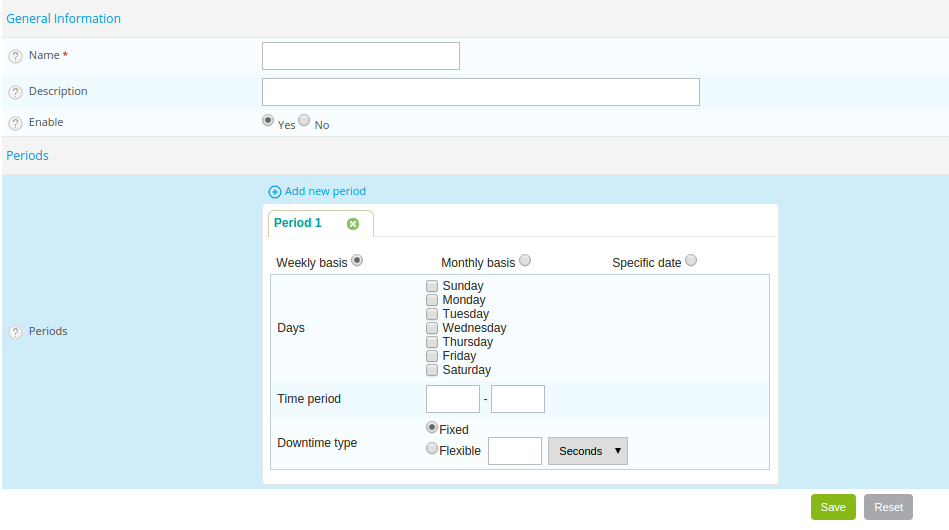
Configuration of Downtime periods
- The Name and Description fields are used to give a name and describe the recurrent downtime period.
- The Enable field is used to enable or disable the downtime period.
- The Periods field is used to define one or more periods of
recurrent downtime periods. To add a period, click the symbol
 .
.
It is possible to choose three types of period:
-
Weekly: to choose the days of the week
-
Monthly: to choose the days of the month
-
Specific date: to choose specific dates
-
The Days field defines the day(s) concerned.
-
The Time period field contains the time period concerned (expressed in HH:MM - HH:MM).
-
The Downtime type field defines the type of downtime period desired.
It is possible to combine several types of period within the same downtime.
Relations
- The Linked with Hosts list can be used to choose the host(s) concerned by the recurrent downtime period.
- If Linked with Host Groups is chosen with the list Linked with the host group, all the hosts belonging to this group are concerned by the recurrent downtime period.
- The Linked with Services list can be used to choose the service(s) concerned by the recurrent downtime period.
- If a service group is chosen with the list Linked with Service Groups, all the services belonging to this group are concerned by the recurrent downtime period.
Add comment
Principle
Centreon allows us to add comments on an object. This Comment is visible by anyone having access to the resource (host or service). A comment has the following properties:
- Hostname
- Servicename if the comment is associated with a service
- Date of entry of the comment
- Author of the comment
- The contents of the comment
- The validity of the comment against a restart of the scheduler
Practice
There are two solutions to add a comment:
- From the detailed sheet of an object
- From the Comment menu
- Access to the details page of the object
- In the category Host/Service Commands, click Add a comment for this host/this service
- Go into the Monitoring > Downtimes > Comments menu
- Click Add a Service Comment or Add a Host Comment
The following window appears:

- The Host Name field defines the host concerned by the comment.
- If you have chosen to add a comment to a service, the Service field can be used to select the service concerned by the comment.
- If the Persistent box is checked, the comment will be maintained in the event of a restart of the scheduler.
- The Comments field contains the comment itself.
Management of checks
Principle
It is possible to temporarily enable or disable a check on a host or a service.
Changes to settings checks do not affect the configuration of the object in the database. These changes are made on the monitoring in real time, and they are canceled if the scheduler is restarted.
Practice
- From the detailed sheet of an object
- From real time monitoring
- Access the details page of the object
- In the category: Options go to the line: Active checks to check the state of the checks.
To:
- Enable the check, click

- Disable the check, click

- Go into the Monitoring > Status Details > Hosts (or Services) menu
- Select the object(s) on which you want to enable or disable the check.
- In the More actions menu, click:
- Hosts : Disable Check or Services: Disable Check to stop the checks on a host or a service
- Hosts: Enable Check or Services: Enable Check to enable the check of a host or of a service
Submitting a result
Principle
For passively checked services, it is possible send a result manually to the scheduler so that it is taken into account.
Practice
To submit a result, access the details page of the object. In the category Service Commands, click Submit result for this service
The following window appears:
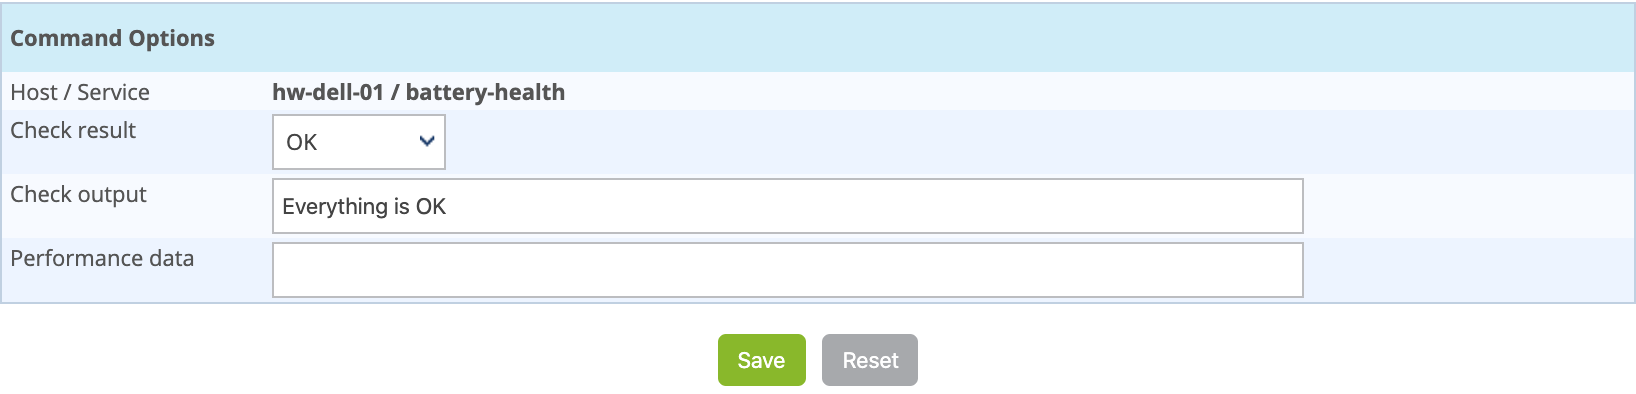
- The Host Name and Service fields define the host and the service for which the result will be submitted
- The Check result field defines the status of the service
- The Check output field defines the message to be displayed for the service
- The Performance data field can be used to define performance data to generate graphs.
Management of notifications
Principle
It is possible to temporarily enable or disable the notification of a host or a service.
Changes to the notification settings do not affect the configuration of the object in the database. These changes are made on the real time monitoring, and they are canceled if the scheduler is restarted.
Practice
There are two ways of managing notifications:
- From the detailed sheet of an object
- From real time monitoring
- Access the details page of the object
- In the category: Options go to the line: Service Notifications
To:
- Enable the notification, click
- Disable the notification, click
- Go into the Monitoring > Status Details > Hosts (or Services) menu.
- Select the host(s) / service(s) whose notification you want to enable or disable.
- In the More actions menu, click:
- Hosts: Disable Notification or Services: Disable Notification to stop notifications for a host or a service
- Hosts: Enable Notification or Services: Enable Notification to enable the notification of a host or a service
Reprogramming checks
Principle
By default, the checks (checks on a service) are executed at regular intervals following the configuration defined by the user. It is possible to act on the check scheduling pile to change the programming of the checks.
There are two types of programming:
- Normal programming: the service check is given priority in the scheduler queue (asap).
- Forced programming: the service check is given priority in the scheduler queue (asap) even if the time of the execution request is outside the check period or if the service is not of the active type.
Practice
There are two ways of forcing the check of a service:
- From the detailed sheet of an object
- From real time monitoring
- Access the detail page of the object
- In the category Host Commands (or Service Commands), click Re-schedule the next check for this host / service or Re-schedule the next check for this host / service (forced)
- Go into the following menu: Monitoring > Status Details > Hosts (or Services)
- Select the objects for which you want to force the check
- In the More actions menu, click Schedule immediate check or Schedule immediate check (Forced).