Attach a poller to a central or a remote server
Prerequisites
Install the poller using packages.
Step 1: Configure a new poller
As of Centreon version 18.10, a new wizard has been added for adding a new poller to the Centreon platform.
-
Go to the Configuration > Pollers > Pollers menu and click Add to configure a new poller.
-
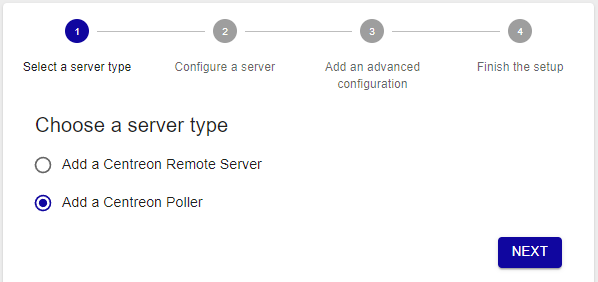
Select Add a Centreon poller and click Next:
-
Select the option you want:
- Create new poller if you haven't registered the poller yet on the central or remote server
- Select a poller if you have already registered the poller on the central or remote server.
If the poller your are adding will be used in reverse flow, you must now export the configuration of your central server. In the top left of your screen, click on Pollers, then click on Export configuration.
- Type in the name, the address of the new poller (IP or FQDN), and the IP address of the central Server. Click Next:
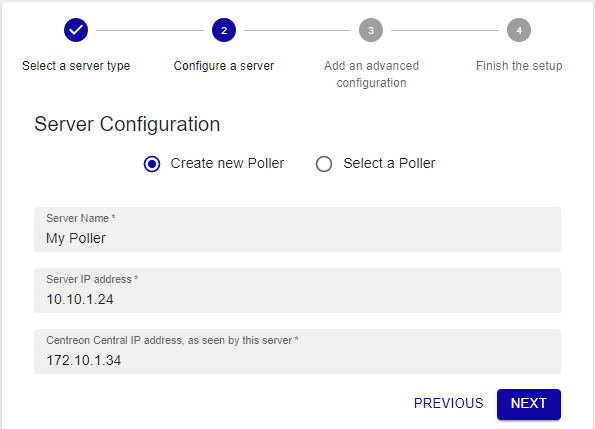
The address of the poller is the IP address or the FQDN used to access this poller from the central server.
The IP address of the central server is the IP address or the FQDN used to access the central server from the poller.
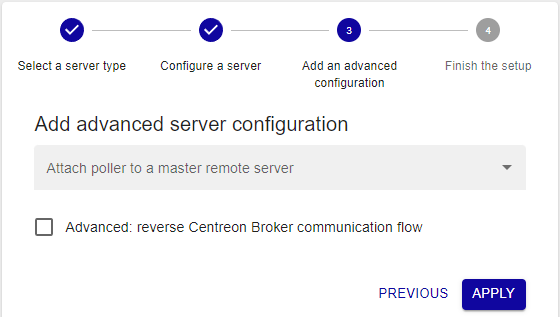
- Link the poller to the central server or to a remote server:
-
If you want to link the poller to the central Server, click Apply:
-
If you want to link the poller to an existing Remote Server, select one from the list, then click Apply.
If you want to change the direction of the flow between the central Server (or the Remote Server) and the poller, check the Advanced: reverse Centreon Broker communication flow checkbox. In this case, it will be necessary to export the configuration of the poller as well as the server to which it will be attached.
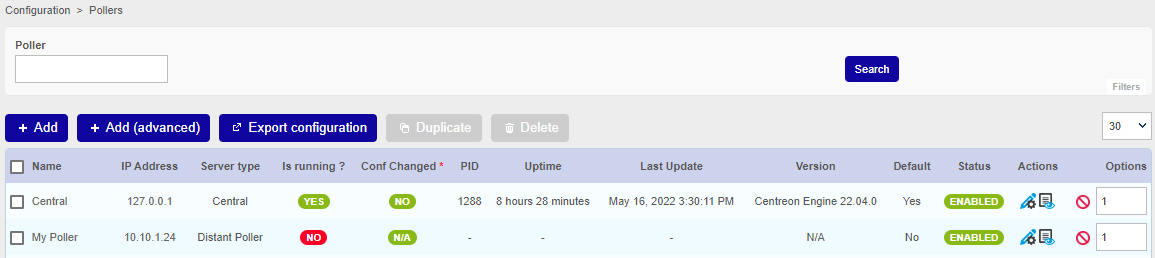
In a few seconds the wizard will configure your new poller.
Step 2: Enable communication
The communication between the central server and a poller is ensured by Gorgone and can be done using ZMQ (with a Gorgone running on the poller, recommended) or using SSH protocol.
- Using ZMQ (Recommended)
- Using SSH
-
Select the communication type:
Edit the newly created poller configuration, and select ZMQ as Gorgone connection protocol. Define the suitable port (port 5556 is recommended).
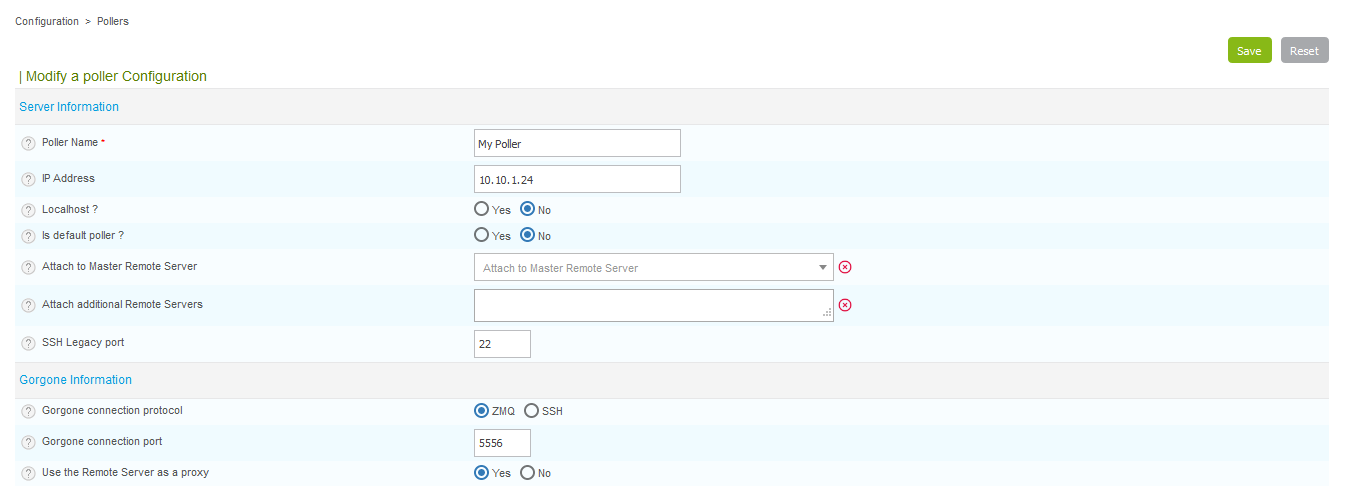
Click Save.
Note that the SSH Legacy port is no longer used, and will be removed.
If you were using it in custom scripts, consider changing to the Gorgone communication system.
-
Copy the Gorgone configuration:
From the poller list, click the Display Gorgone configuration action icon on the line corresponding to your poller

A popin will show the configuration to copy into the poller terminal. Click Copy to clipboard.
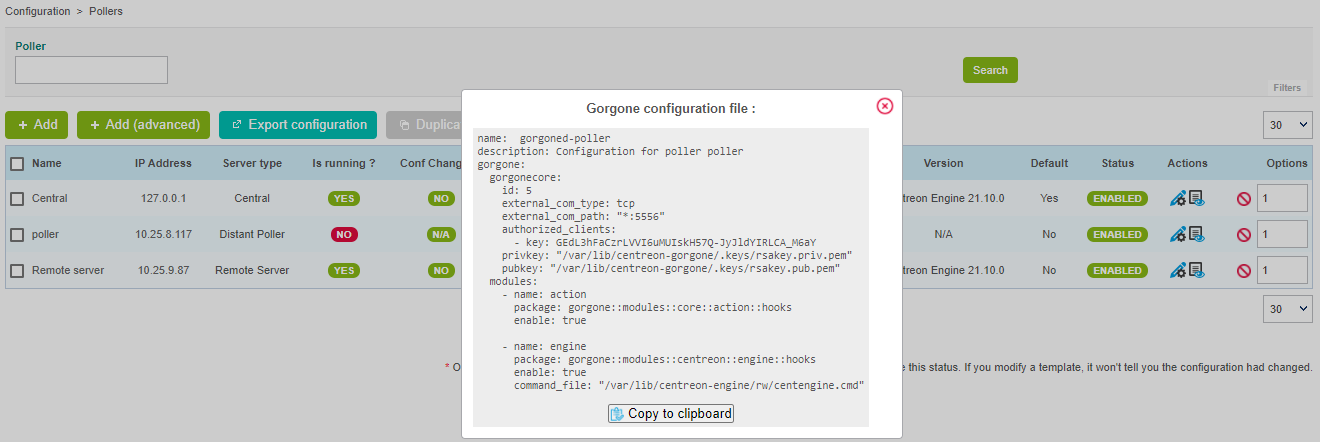
Paste the content of the clipboard directly into the poller terminal as it contains the following content, and will fill the right file:
cat <<EOF > /etc/centreon-gorgone/config.d/40-gorgoned.yamlname: gorgoned-My Pollerdescription: Configuration for poller My Pollergorgone:gorgonecore:id: 2external_com_type: tcpexternal_com_path: "*:5556"authorized_clients:- key: Np1wWwpbFD2I0MdeHWRlFx51FmlYkDRZy9JTFxkrDPIprivkey: "/var/lib/centreon-gorgone/.keys/rsakey.priv.pem"pubkey: "/var/lib/centreon-gorgone/.keys/rsakey.pub.pem"modules:- name: actionpackage: gorgone::modules::core::action::hooksenable: true- name: enginepackage: gorgone::modules::centreon::engine::hooksenable: truecommand_file: "/var/lib/centreon-engine/rw/centengine.cmd"EOFHit the Enter key for the command to be applied.
You can copy the configuration in a custom file by copying the content from the popin.
-
Restart the Gorgone daemon:
From the poller, run the following command to restart the Gorgone service:
systemctl restart gorgonedMake sure it is started by running the following command:
systemctl status gorgonedIt should result as follows:
● gorgoned.service - Centreon GorgoneLoaded: loaded (/etc/systemd/system/gorgoned.service; disabled; vendor preset: disabled)Active: active (running) since Mon 2020-03-24 19:45:00 CET; 20h agoMain PID: 28583 (perl)CGroup: /system.slice/gorgoned.service├─28583 /usr/bin/perl /usr/bin/gorgoned --config=/etc/centreon-gorgone/config.yaml --logfile=/var/log/centreon-gorgone/gorgoned.log --severity=info├─28596 gorgone-dbcleaner├─28597 gorgone-engine└─28598 gorgone-actionMar 24 19:45:00 localhost.localdomain systemd[1]: Started Centreon Gorgone. -
To force the central's Gorgone daemon to connect to the poller, restart it with the following command from the central server:
systemctl restart gorgoned
-
Select the communication type:
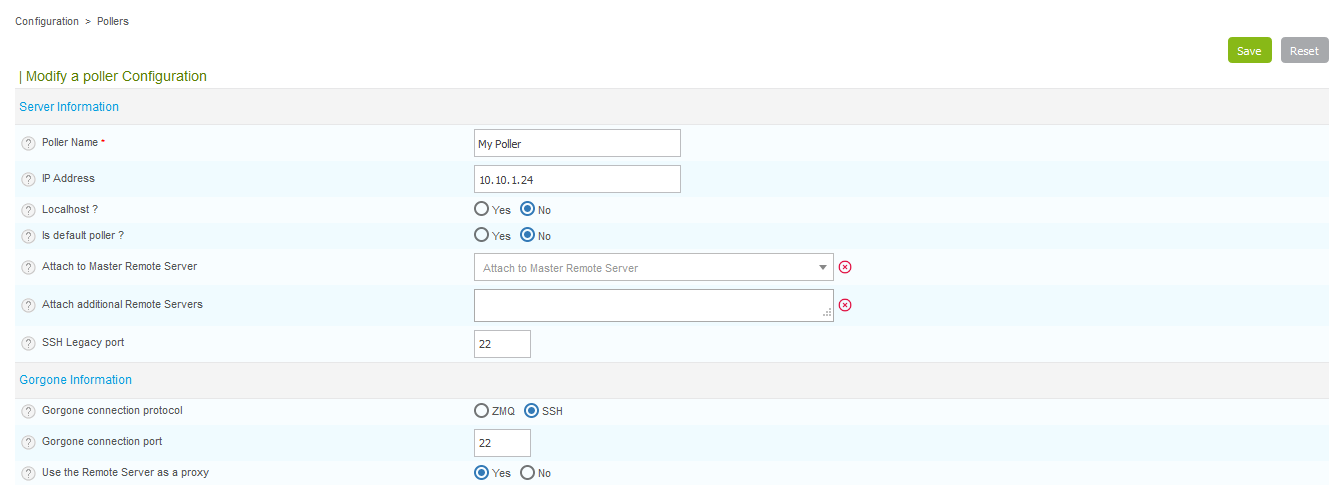
Edit the newly created poller configuration, and select SSH as Gorgone connection protocol. Define the suitable port.
-
Click Save.
Note that the SSH Legacy port is no longer used, and will be removed.
If you were using it in custom scripts, consider changing to the Gorgone communication system.
-
Exchange SSH keys:
If you do not have any private SSH keys on the central server for the centreon-gorgone user, create one with the following commands:
su - centreon-gorgonessh-keygen -t rsaHit enter when it prompts for a file to save the key to use the default location, or create one in a specified directory. Leave the passphrase blank. You will receive a key fingerprint and a randomart image.
Generate a password for the centreon user on the new poller:
passwd centreonThen, copy this key on to the new poller with the following commands:
su - centreon-gorgonessh-copy-id -i .ssh/id_rsa.pub centreon@<IP_POLLER> -
To force the central's Gorgone daemon to connect to the poller, restart it with the following command from the central server:
systemctl restart gorgoned
Step 3: Export the configuration of the remote
This step only applies if you are attaching a poller to a remote server (not to a central server).
-
On the central server, deploy the configuration of the remote server to which the poller will be attached:
- Go to Configuration > Pollers > Pollers and select the remote server.
- Click Export configuration.
- Select the first four boxes, select the Restart method, and then click Export.
-
Restart gorgone on the remote server:
systemctl restart gorgoned
Step 4: Export the configuration of the poller
-
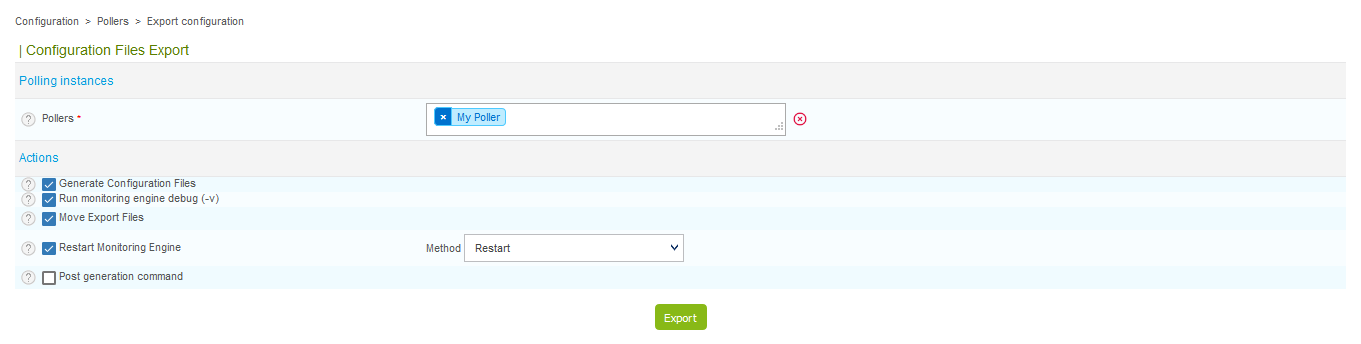
From the poller list, select the poller and click Export configuration.
-
Then check the first four boxes, select the Restart method, and click Export:
The poller's engine will then start and connect to the Broker service of the central server or remote server (according to which one you have attached the poller to).

Getting started
Go to the Getting Started chapter to configure your first monitoring.