Creating hosts manually
To create a host manually:
- Go to Configuration > Hosts > Hosts and then click Add.
- Fill in the fields (see below), and then click Save.
- Deploy the configuration.
Host configuration tab
Host basic information
- Name: host name used by the Monitoring Engine. Cannot contain
~!$%^&|'"<>?,()=*{}and spaces will be automatically replaced with _. You may use theh.name:syntax in the Search bar of the Resource status to look up a host. - Alias: another name for the host. Spaces and characters unauthorized in the name are allowed here. You may use the
h.alias:syntax in the Search bar of the Resource status to look up a host. - Address: IP address or DNS name of the host. The Resolve button tests the domain name by questioning the DNS server configured on the central server. If given a DNS name, the Resolve button will also replace the text with the matching IP address. You may use the
h.address:syntax in the Search bar of the Resource status to look up a host. - SNMP Community & Version: name of the community that you have defined for the equipment and its version. If the version is 1 or 2c, enter the community's name in the first field. If the version is 3, leave the first field empty and fill in the
snmpextraoptionscustom macro that will automatically appear in the Host check options section. - Monitoring server: which Centreon server (central, poller or remote) will monitor this host.
- Timezone: location of the host. Note that the timezone defined here is what determines when checks will be carried out on this host, not the timezone of the server monitoring it.
- Templates: associate one or more host templates with this object.
If multiple templates modify the same field, the properties of the template placed above the others will be applied.
Here is an example of a host with 3 templates applied to it.
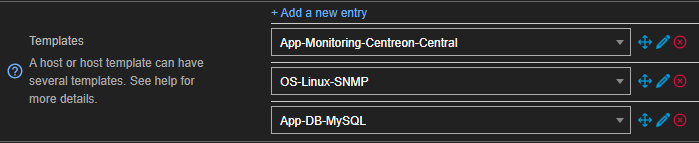
-
App-DB-MySQL applies its configuration.
-
OS-Linux-SNMP then overwrites it where its own configuration is in conflict with App-DB-MySQL but will not change fields for which it has no new information. Fields that were not modified previously by App-DB-MySQL for which OS-Linux-SNMP has new information will be filled in with it.
-
App-Monitoring-Centreon-Central then does the same with the configuration from OS-Linux-SNMP.
Modifying the order of the templates automatically updates the applied configurations if necessary.
- This button
 enables us to change the order of host templates.
 - This button
 is used to delete the host template.
- If the Create Services linked to the Template too field is defined as Yes, Centreon automatically generates the services according to the service templates of the host templates placed above the others.
Access groups (option for non-administrators)
- ACL Resource Groups: link this host to an ACL group, this action can only be performed by non-administrators users.
Host check options
-
Check Command: command used to check the availability of the host. Useful if you did not apply any templates to the host or if you want to overwrite the command included in it..
-
Args: arguments given to the check command (each argument starts with ”!”).
-
Custom macros: is automatically populated as you add templates, but you can also add your own custom macros.
- Name and Value define the name and value of the macro.
- Checking the Password box hides the value of the macro.
To revert to the value defined by the template, click

To view the description of the macro, click

To delete the macro, click
To change the order of the macros, click
Scheduling options
- Check Period: time period during which active checks will be performed.
- Max Check Attempts: the number of checks to be performed before confirming the status of the host as not OK. When the status is confirmed, the notification process is triggered.
- Normal Check Interval: interval in minutes between checks when the host status is OK.
- Retry Check Interval: interval expressed in minutes referring to the wait between the checks done to confirm the status of the host is not "OK". Once the max check attempts have been made, the interval between checks returns to its normal value.
- Active Checks Enabled and Passive Checks Enabled: enable / disable the active and passive checks. Passive checks are information the monitored resource sends to the monitoring engine without it having been actively requested.
Notification tab
Learn more about notifications and contacts.
- Notification Enabled: used to enable or disable notifications concerning the object.
- Linked contacts: contacts that will receive the notifications. These contacts must be configured in the Configuration > Users > Contact / Users page.
- Linked contacts Groups: groups of contacts that will receive the notifications. Groups must be configured in the Configuration > Users > Contact / Users page.
If, on page Administration > Parameters > Centreon UI, the Vertical inheritance only option is enabled, the two previous fields will have had a checkbox below them to enable additive inheritance. When checked, the host will contacts and contacts groups added here will not override those added from the template but add themselves to those.
- Notification Options: define the statuses for which a notification will be sent. If no boxes are checked, you will receive notifications for all the statuses listed.
- Notification Interval: expressed in minutes. It indicates the time between sending notifications when the status is Not-OK. If the value is defined as 0, Centreon sends a single notification per status change. If the value is defined as 0, the scheduler sends a single notification per status change.
- Notification Period: indicates the time period during which the notifications will be enabled. No notifications will be sent outside this period, even if a status change occurs.
- First notification delay: expressed in minutes. It refers to the time delay before sending the first notification when a Not-OK status is validated. Setting the value to 0 will cause notifications to be sent immediately.
- Recovery notification delay: time that must pass before a recovery notification is sent (when the host goes back to an UP status). Setting the value to 0 will cause notifications to be sent immediately.
Relations tab
- Host Groups: host groups to which the host belongs. Groups allow you to make changes to many hosts at the same time. Organizing your hosts in groups allows you to visualize reports for many objects at once, search for a set of objects and other features.
- Host Categories: categories to which the host belongs.
- Parent Hosts: define another host as a parent for this host. This can reduce the number of redundant notifications since the monitoring engine will send notifications for the parent hostand not for the child host. A host is considered to have no parent host if it is on the same network segment as the host doing the monitoring without any intermediates. Leave this field blank if that is the case.
- Child Hosts: designate the current host as the parent for other hosts.
Data processing tab
- Acknowledgement timeout : is expressed in minutes. Once this time limit expires, the acknowledgement tag is removed from this host. If its status is still not-OK when this happens, the notification process starts once again. Leave this blank so acknowledgements do not expire.
- Check Freshness: active check performed by the engine when the amount of time determined in the Freshness Threshold has elapsed since the last passive command of the object.
- Freshness Threshold: expressed in seconds. If, during this period, no passive command is received from the host, the active check command is executed. A threshold will be determined automatically if the field is left blank and the check is enabled.
- Flap Detection Enabled: enable or disable the detection flapping in the statuses (status value changing too often in a given period).
- Low Flap Threshold and High Flap Threshold define the high and low thresholds for the detection of flapping as a percentage of status change.
- Retain Status Information and Retain Non Status Information: indicate if the information concerning the status is saved after each time the check command is repeated.
- Event Handler Enabled: enables or disables the event handler, these are commands executed automatically when the host changes its status and can potentially allow Centreon to solve an issue without needing to send a notification.
- Event Handler: command to be executed if the event handler is enabled.
- Args: arguments of the events handler command.
Host Extended Infos tab
Monitoring engine
- Note URL: clickable URL that will appear as an icon in the Notes column on the Resource Status page (the Notes column must be displayed for this).
- Note: text replacing the Note URL in the Notes column that shows as you hover the icon with your mouse. If this field is left blank, the entire link text will appear when the icon is hovered.
- Action URL: URL normally used for giving information on actions on the host (maintenance, etc.).
- Icon: icon used for the host, it can be seen in a variety of places such as the ressource status page. A 40x40 pixels format is recommended.
- Alt Icon: optional string shown when the Icon cannot be displayed.
- Host severity: severity level of the host. This is a special type of category that also allows you to sort the Resource Status by severity level.
- Geographic coordinates: geographical coordinates used by the Centreon MAP module to position the resource on a map. Define "Latitude,Longitude"; for example, the set of coordinates for Paris is "48.51,2.20"
Additional Information
- Enable/disable resource: determine whether or not the host and its services must be monitored. If the host is disabled, it will still show on the list of hosts but will not appear on the Resources Status page. Warning, disabled hosts still count towards the number of hosts included with your licence.
- The Comments: add a comment concerning the host.
Remember to deploy the configuration for your changes to be taken into account.