Configuring your Centreon to send emails
For your Centreon to be able to send notification emails, you need to configure a local SMTP server.
This page gives you an example of a possible configuration. Refer to the official Postfix documentation for more information.
On some distributions, Postfix may already be installed.
Notification commands are executed by the poller that monitors the resource, so you need to configure the mail relay on all pollers.
We recommend that you use a dedicated email account to send notifications.
Step 1: Configuring Postfix
- In your server's terminal, enter the following command:
- Alma 8
- Alma 9
- RHEL / Oracle Linux 8
- RHEL / Oracle Linux 9
- Debian 11 & 12
dnf install postfix mailx cyrus-sasl-plain
dnf install postfix mailx cyrus-sasl-plain
dnf install mailx cyrus-sasl-plain
dnf install s-nail cyrus-sasl-plain
apt install postfix bsd-mailx libsasl2-modules
-
Restart Postfix:
systemctl restart postfix -
Configure Postfix to run at startup:
systemctl enable postfix -
Edit the following file:
vi /etc/postfix/main.cf -
Add the following information:
- With authentication/TLS
- Without authentication/TLS
myhostname = hostname
relayhost = [smtp.isp.com]:port
smtp_use_tls = yes
smtp_sasl_auth_enable = yes
smtp_sasl_password_maps = hash:/etc/postfix/sasl_passwd
smtp_tls_CAfile = /etc/ssl/certs/ca-bundle.crt
smtp_sasl_security_options = noanonymous
smtp_sasl_tls_security_options = noanonymous
- myhostname is the hostname of the Centreon server.
- relayhost is the email server for the account that will send notifications.
In the following example, Centreon will use a Gmail account to send notifications:
myhostname = centreon-central
relayhost = [smtp.gmail.com]:587
smtp_use_tls = yes
smtp_sasl_auth_enable = yes
smtp_sasl_password_maps = hash:/etc/postfix/sasl_passwd
smtp_tls_CAfile = /etc/ssl/certs/ca-bundle.crt
smtp_sasl_security_options = noanonymous
smtp_sasl_tls_security_options = noanonymous
myhostname = centreon-central
relayhost = [smtp.gmail.com]:587
smtp_use_tls = no
smtp_sasl_auth_enable = no
-
Restart Postfix:
systemctl restart postfix
Step 2: Configuring the credentials of the account that will send emails
-
Create a
/etc/postfix/sasl_passwdfile:touch /etc/postfix/sasl_passwd -
Add the following line (replace
username:passwordwith the credentials of the account that will send the notification emails):[smtp.isp.com]:port username:passwordExample:
[smtp.gmail.com]:587 username@gmail.com:XXXXXXXX -
Save the file.
-
In the terminal, enter the following command:
postmap /etc/postfix/sasl_passwd -
For security reasons, change the permissions on the file:
chown root:postfix /etc/postfix/sasl_passwd*chmod 640 /etc/postfix/sasl_passwd* -
Reload Postfix so that changes are taken into account:
systemctl reload postfix
Testing and troubleshooting email configuration
-
To send a test email, enter the following command:
echo "Test" | mail -s "Test" user@isp.comReplace
user@isp.comwith a real email address. The recipient should receive the test email. -
If the user has not received the message, check the following log file (if it exists):
- Alma / RHEL / Oracle Linux 8
- Alma / RHEL / Oracle Linux 9
- Debian 11 & 12
tail -f /var/log/maillog
tail -f /var/log/maillog
tail -f /var/log/mail.log
-
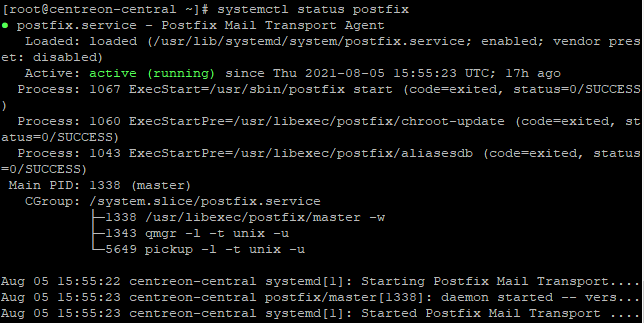
To check that your Postfix service is running, enter:
systemctl status postfixThe results should look like this:
Gmail configuration
To use postfix with Gmail, you need to use an app password.