Dashboards
Get started with creating dashboards and adding widgets specially designed to optimize your user experience. Then benefit from data visualization options to display and monitor your resources in real time.
Activating the Dashboards feature
Access to the Dashboards feature is not managed at the user level, but through access groups or ACLs (Access Control Lists). You allow users to access the feature by granting rights to the ACL to which they belong (read more about ACLs).
Configure the ACL
- You must be logged into Centreon as an administrator.
- In this example, we will create a new ACL called Dashboards users. This ACL will contain users belonging to the Guests user group.
- Go to Administration > ACL > Menus Access.
- Click the Add button. This opens the Add an ACL form.
- Name the ACL Definition. In this example: Dashboards users.
- Select Enabled in the Status parameters.
- Select the Linked Groups to include in this ACL. In this example: Guests.
- In the Accessible Pages section, expand the Home menu, then the Dashboards one. This displays the list of profiles to select.
- Viewer: can only view dashboards to which they have access.
- Creator: can create and edit dashboards to which they have access.
- Administrator: can access and edit all dashboards.
- Select the profile to be set for this ACL. In this example: Viewer.
- Click Save to confirm your changes.
Check the feature is activated
You must have a user account with ACL rights to the Dashboards feature.
- Log into Centreon.
- You should see in the Home menu, the Dashboards entry.
Creating your first dashboard
You must be logged into Centreon with administrator or creator rights.
- In the Dashboard library page, click the Create a dashboard button. This opens the Create dashboard window.
- Name the dashboard and enter a description if needed.
- Click Create to confirm the creation.
Your dashboard is now added! You can directly start adding widgets.
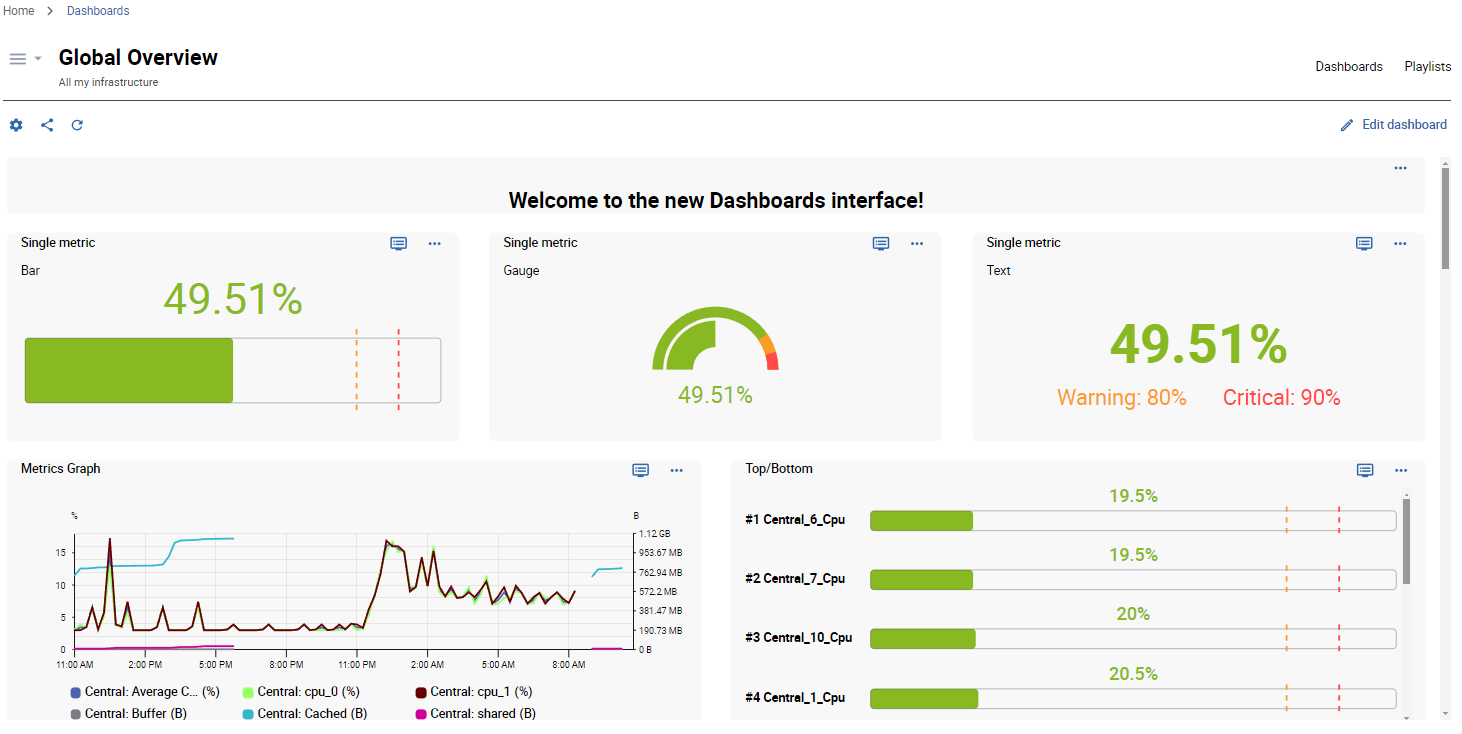
Add widgets
Your dashboard must be open in edition mode.
- If this is your very first widget, click the Add a widget area.
- If not, click the + Add a widget on the right of the interface.
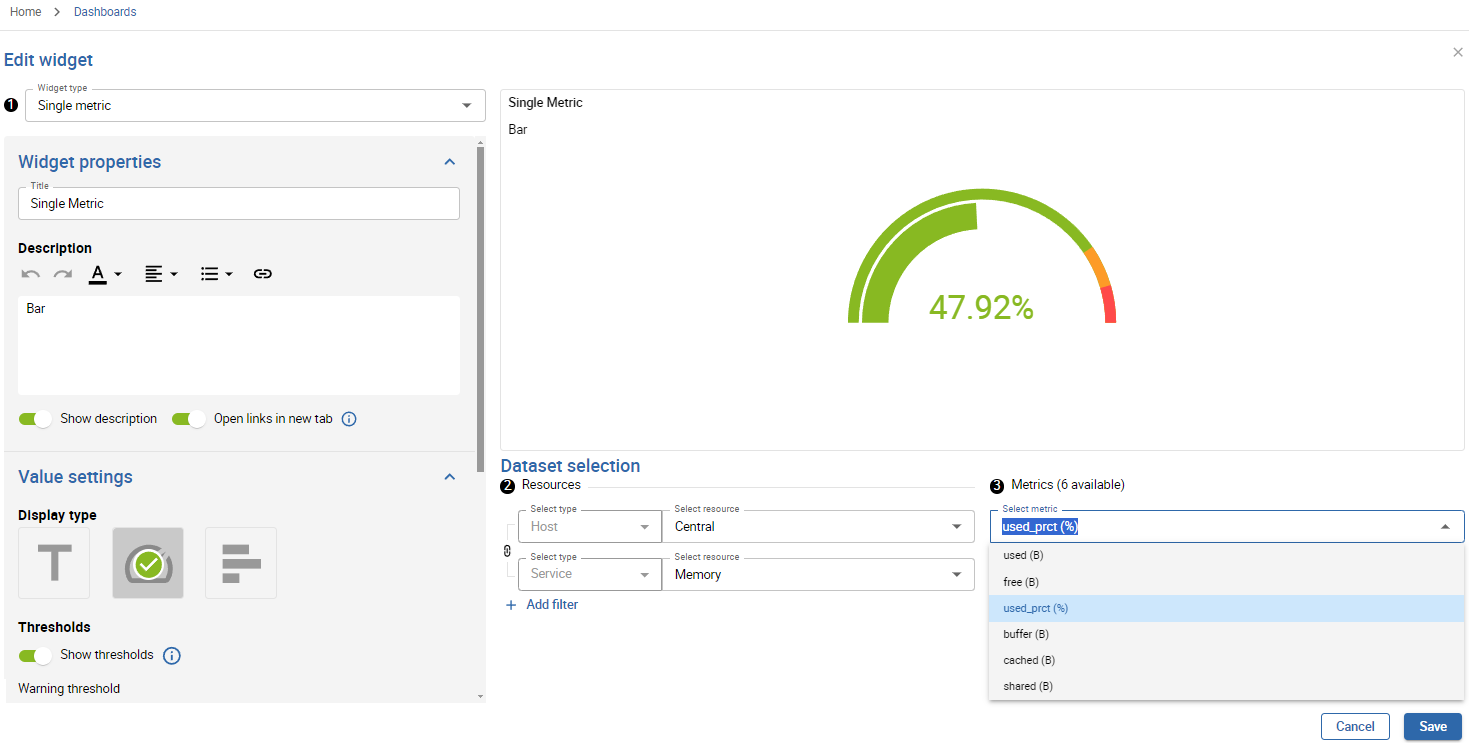
Most of the widgets usually follow these steps:
- Step 1: Select the type of widget. The widget parameters then depend on the widget you select.
- Step 2: Select resources.
- Step 3: Select metrics.
Make sure to save your changes. If you leave without saving your dashboard, changes will be permanently lost.
More actions
Click the three vertical dots menu at the top right of the widget to edit it or to access more actions:
- Duplicate
- Delete widget
In edition mode, you can easily organize your widgets by moving or resizing them. Make sure to save your changes.
Link to Resources Status page
From the dashboard, you can click a screen pictogram at the top right of a widget: this button allows you to See more on the Resources Status page. It opens a new tab on the Resources Status page, with detailed information regarding the specific widget.
Managing dashboards
You must be in the Dashboard library page to get an overview of your dashboards.
Edit a dashboard
Update properties
Click the gear button at the top left of the dashboard to update its name and description.
Edit dashboard widgets
- Click the dashboard to open it in view mode.
- Click Edit dashboard to access and manage widgets in edition mode.
Delete a dashboard
Click the trash button at the bottom left of the dashboard to delete it. Then confirm the deletion.
Share a dashboard
You can share dashboards using the Manage access rights interface.
About access rights
You are using the Dashboards feature with a viewer or an editor profile:
- Viewers: can only view dashboards you share with them.
- Editors: can view and edit dashboards you share with them.
Manage access rights
- Click the share button at the bottom right of the dashboard.
- In the Add contact dropdown list, select the user to add.
Only users meeting the following two conditions are displayed:
- belong to the same access groups as yours,
- have access to the Dashboards menu (can be activated using access rights).
- Select either Viewer or Editor profile.
- Click the + button to add it.
- Repeat the action for each user you want to add.
- Click the Update button to save your changes.
The users you have just added now have access to your dashboard sharing, according to the profile you have set for them.
Use the Copy link feature to share the dashboard URL directly with users who have access to your platform.
Add a dashboard to favorites
You can add dashboards to favorites so you can easily retrieve them. Favorites are managed with the heart-shaped icon, colored green when the dashboard is marked as a favorite, colored gray when it is not.
Note that favorites are specific to the user, this list is not visible to other users.
- Click the Add to favorites (heart-shaped) icon associated to the dashboard you want. The icon becomes green.
- Click again to Remove from favorites. The icon becomes gray.
- Check the Show only dashboards added to favorites box to display only your favorites.
Managing playlists
Playlists are lists of selected dashboards to be broadcast in the order of your choice. This feature is useful for instance when you want to display your dashboards on a full-screen TV in public spaces.
This feature requires a valid license key. To purchase one and retrieve the necessary repositories, contact Centreon.
Create a playlist
Before creating a playlist, make sure the dashboards you want to include have been created.
- Click the Playlists link to access the playlists interface.
- Click the Create a playlist button (or the Add button if it is not your first playlist).
- Fill in the properties:
- Name
- Description
- Add your dashboards from the Select dashboards drop-down list.
- In the Define the order of dashboards section, drag and drop the dashboards as you want.
- Define the rotation time in seconds.
- Click Save. Your playlist is now added to the list of playlist.
Display the playlist
- From the Playlists interface, click the row for your playlist. Your playlist is now displayed and a control banner appears when you hover over the bottom of the interface.
Get a better visualization by displaying the page in full screen mode (F).
The control banner allows you to:
- Play/Pause the broadcast.
- Go to the previous or next dashboard.
- Go directly to a specific dashboard by clicking its name.
Share the playlist with users of your platform
You can share your playlist with contacts who have access to your Centreon platform and are authorized Dashboards viewers.
- Click the Share with contacts button from the line of your playlist. The Playlist access rights window is displayed.
- In the Share with section, add contacts or contact groups and define their rights as viewer or editor.
- Use the trash button in the User rights section to remove a contact or contact group.
- Then Save your changes.
Share the playlist with a public link
You can send a public link to non-Centreon users, giving them access to a full-screen view of their IT infrastructure.
- The link you share will display the playlist content based on the access rights of the user activating the link. Anyone with this link can view the playlist. Be cautious when you share it.
- The language used is the one set by the current browser, even if the initial language of the playlist is different.
- In the Playlist access rights window, click the Activated button in the Public link section.
- You can now copy the URL link to the playlist.
- You can also resize and copy the embedded code of the playlist view.
Edit/Delete a playlist
The three dots action menu at the end of a playlist row allows you to edit properties or delete the playlist.
List of widgets
Note that some widgets require a specific license.
| Widget | Description |
|---|---|
| Business Activity availability | Displays availability and alerts of a Business Activity for a given period. |
| Business Activity availability history | Displays the availability history of a Business Activity or a Business View for a given period. |
| Business Activity Diagram | Displays graphically a business activity hierarchy of KPIs and lets you navigate through it. |
| Business Activity status timeline | Displays the distribution of current statuses on a Business Activity, as a chronological timeline for a given time period. |
| Clock/Timer | Displays the time according to the selected time zone, or a timer. |
| Generic text | Allows you to add free text to your dashboards (section titles, information, etc.). |
| Group monitoring | Displays the distribution of current statuses on selected groups of resources, as a table. |
| Hostgroup availability history | Displays the availability history of hosts, host categories or hostgroups. |
| MAP - Display a view | Allows you to select and visualize a map created from the MAP module. |
| Metric capacity planning | Displays the real-time average of the metric and a trend curve. |
| Metrics graph | Displays metrics for a given time period. |
| Resource table | Displays data on resource status and events, centralized in a table. Also displays resources linked to a ticket or not. |
| Single metric | Displays the value of a single metric as a text, a gauge or a bar chart. |
| Status chart | Displays the distribution of current statuses on selected resources, as a chart. |
| Status grid | Displays the current status of selected resources, as a grid. |
| Top/bottom | Displays the top or bottom x hosts, for a selected metric. |
| Web page | Displays a web page. |