Centreon Monitoring Agent
Introduction​
The Centreon Monitoring Agent (CMA) collects metrics and computes statuses on the servers it monitors, and sends them to Centreon. Centreon plugins as well as Nagios-compatible plugins can be used with this agent.
Limitations​
The Centreon Monitoring Agent is in Beta Phase. The following limitations need to be considered :
- The scope of supported monitoring is limited, new (native) controls will be introduced in the final version.
Supported OSs​
The CMA can be installed on and monitor the following OSs:
- Linux
- Windows
- Alma 8
- Alma 9
- Debian 11
- Debian 12
- Ubuntu 22.04 LTS
- Windows 10
- Windows 11
- Windows Server 2016
- Windows Server 2019
- Windows Server 2022
Step 1: Configure Centreon​
Install the Monitoring Connector​
- Linux
- Windows
- On your central server, go to Configuration > Monitoring Connector Manager.
- Install the Linux Centreon Monitoring Agent monitoring connector.
- On your central server, go to Configuration > Monitoring Connector Manager.
- Install the Windows Centreon Monitoring Agent monitoring connector.
Create the CMA connector​
On your central server:
- Go to Configuration > Commands > Connectors.
- Create a new connector with the following values:
Parameter | Value |
---|---|
Connector Name | Centreon Monitoring Agent |
Connector Description | Centreon Monitoring Agent |
Command Line | opentelemetry --processor=centreon_agent --extractor=attributes --host_path=resource_metrics.resource.attributes.host.name --service_path=resource_metrics.resource.attributes.service.name |
Used by command | Type Centreon-Monitoring-Agent and click Select all |
Connector Status | Enabled |
Configure Engine​
- Configure how the poller and the agent will communicate:
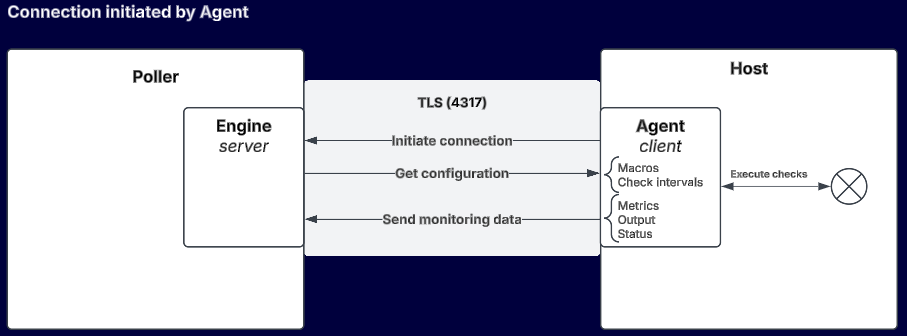
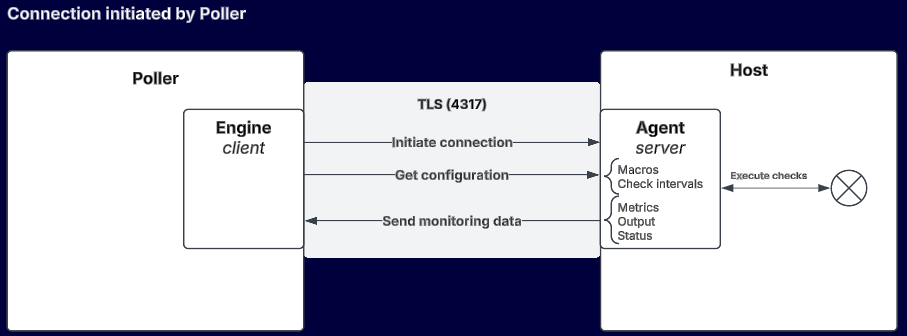
- Some agents can connect to the poller, while the poller can connect to some other agents.
- You can select several pollers at once in a single configuration form so that you don't have to do the same configuration several times.
- Go to Configuration > Pollers > Agent configurations and click Add poller/agent configuration.
- In the window that opens, select the type of agent you want to configure. Additional fields appear.
- In the Parameters section, select the poller(s) that will receive data from the agent.
- In the OTLP receiver section, enter the file names for the certificates for the part of the poller that will receive data from the agent, i.e., the poller's engine. Communication between the agent and the poller is always in HTTPS. You need to store the certificates in the /etc/pki/ directory of the poller.
- If the agent is not allowed to connect to the poller for security reasons (e.g. when the poller is in a DMZ), enable Connection initiated by poller. Then, in Host configurations, define all the hosts on which the agent will be installed. Here the certificates are optional, but if you use them, store them in the /etc/pki/ directory of the poller.
If you configure several pollers at once, make sure all certificate files have the same name.
-
Deploy the configuration.
-
Restart the monitoring engine:
systemctl restart centengine
The CMA can now communicate with Centreon. You can set up the monitoring of your hosts.
Step 2: Prepare the host​
Download and install the agent​
- Linux
- Windows
Centreon repository and agent install​
Install the Centreon repository and agent using the following commands:
- Alma / RHEL / Oracle Linux 8
- Alma / RHEL / Oracle Linux 9
- Debian 12
dnf install -y dnf-plugins-core
dnf config-manager --add-repo https://packages.centreon.com/rpm-standard/24.10/el8/centreon-24.10.repo
dnf install centreon-monitoring-agent
dnf install -y dnf-plugins-core
dnf config-manager --add-repo https://packages.centreon.com/rpm-standard/24.10/el9/centreon-24.10.repo
dnf install compat-openssl11 centreon-monitoring-agent
apt-get update
apt-get -y install lsb-release gpg wget
echo "deb https://packages.centreon.com/apt-standard-24.10-stable $(lsb_release -sc) main" | tee /etc/apt/sources.list.d/centreon.list
echo "deb https://packages.centreon.com/apt-plugins-stable/ $(lsb_release -sc) main" | tee /etc/apt/sources.list.d/centreon-plugins.list
Then, import the repository key :
wget -O- https://apt-key.centreon.com | gpg --dearmor | tee /etc/apt/trusted.gpg.d/centreon.gpg > /dev/null 2>&1
Then, install agent :
apt-get update
apt install centreon-monitoring-agent
- Configure centreon-monitoring-agent.
- Modify the /etc/centreon-monitoring-agent/centagent.json file (4 cases):
- No encryption, agent connects to poller
- Encryption, agent connects to poller
- No encryption, poller connects to agent
- Encryption, poller connects to agent
{
"log_level":"info",
"endpoint":"<IP POLLER>:4317",
"host":"host_1",
"log_type":"file",
"log_file":"/var/log/centreon-monitoring-agent/centagent.log"
}
{
"log_level":"info",
"endpoint":"<IP POLLER>:4317",
"host":"host_1",
"log_type":"file",
"log_file":"/var/log/centreon-monitoring-agent/centagent.log" ,
"encryption":true,
"ca_certificate":"/tmp/ca_1234.crt"
}
{
"log_level":"info",
"endpoint":"0.0.0.0:4317",
"host":"host_1",
"log_type":"file",
"log_file":"/var/log/centreon-monitoring-agent/centagent.log" ,
"reversed_grpc_streaming":true
}
{
"log_level":"info",
"endpoint":"0.0.0.0:4317",
"host":"host_1",
"log_type":"file",
"log_file":"/var/log/centreon-monitoring-agent/centagent.log" ,
"reversed_grpc_streaming":true,
"encryption":true,
"private_key":"/tmp/server_1234.key",
"public_cert":"/tmp/server_1234.crt",
"ca_certificate":"/tmp/ca_1234.crt"
}
In the host field, enter the name of the host to be monitored as you have entered it in the Centreon interface. If absent, the agent will use the machine's hostname.
Log configuration​
You can configure two kinds of log output:
- file: the CMA logs into a file, the path is configured in the log_file option.
- stdout: standard output is used.
If you choose to log into a file, log rotation can be customized using the log_max_file_size and log_max_files options.
Allowed log levels are:
- off: no logs
- critical: critical errors
- error: all errors
- info: additional information
- debug: more information about connections
- trace: the most verbose trace level showing messages sent and received to the poller
- Restart the CMA:
systemctl restart centagent
You can check that agent is running with:
systemctl status centagent
Download the CMA installer on every server you want to monitor.
- Interactive mode
- Silent mode (console)
- Start the installer (during the configuration, you can click on the (i) icons for help). If you choose to install centreon-plugins, the installer will try to download and install the latest version of the Centreon plugins. If it can't (no web connection, network issue...), a popup is displayed to ask confirmation before using embedded plugins.
- If yes: the plugins are installed
- If no: no plugins are installed
Results are displayed in the installer's window.
-
Configure the endpoint and the connection:
- Host name in Centreon. This must be the host name you have defined in the Centreon interface.
- In most cases (the agent connects to the poller), you have to enter the poller's endpoint. The correct format is <poller IP or DNS name>:port (OpenTelemetry listening port on the poller, usually 4317), for example 192.168.45.32:4317.
- In case of a poller-initiated connection (the poller connects to the agent), you have to choose a host interface (0.0.0.0 for all interfaces) and the listening port on which poller will connect, usually 4317.
-
Configure logging options. You can configure two kinds of log output:
- file: the CMA logs into a file
- eventlog: the CMA logs in the event logs page
If you choose to log into a file, log rotation can be customized using the Max File Size and Max number of files options.
- Configure encryption Encryption is activated by default. In case of a Poller-initiated connection, the private key file and certificate file are mandatory.
In this mode, there is no interface. As this installer is not a console program, it returns immediately despite not having finished. You have to wait for a message telling you that all is finished. If you wnat to have an exit status, you can launch the installer in a powershell session and wait for the exit code. The exit code will be 0 if all is right.
flag | description |
---|---|
--install_cma | Set this flag if you want to install the Centreon Monitoring Agent |
--install_plugins | Set this flag if you want to download and install the latest version of Centreon plugins |
--install_embedded_plugins | Set this flag if you want to install Centreon plugins embedded in the installer (case of a host that cannot access the internet) |
--hostname | The name of the host as defined in the Centreon interface. |
--endpoint | IP address of DNS name of the poller the agent will connect to. In case of Poller-initiated connection mode, it is the interface and port on which the agent will accept connections from the poller. 0.0.0.0 means all interfaces. The format is (IP or DNS name):(port) |
--reverse | Add this flag for Poller-initiated connection mode. |
--log_type | event_log or file. In case of logging in a file, log_file param is mandatory |
--log_level | can be off, critical, error, warning, debug or trace |
--log_file | log files path. |
--log_max_file_size | max file in Mo before rotate. |
--log_max_files | max number of log files before delete. For the rotation of logs to be active, it is necessary that both parameters 'Max File Size' and 'Max number of files' are set. |
--encryption | Add this flag for encrypt connection with poller. |
--private_key | Private key file path. Mandatory if encryption and poller-initiated connection are active. |
--public_cert | Public certificate file path. Mandatory if encryption and poller-initiated connection are active. |
--ca | Trusted CA's certificate file path. |
--ca_name | Expected TLS certificate common name (CN). |
--reverse | Add this flag to make the agent accept connections from poller (agent in DMZ for example). |
If you use --install_plugins option and plugins download fail, installer will install plugins embedded in the installer.
Allowed log levels are:
- off: no logs
- critical: critical errors
- error: all errors
- info: additional information
- debug: more information about connections
- trace: the most verbose trace level showing messages sent and received to the poller
As far as encryption is concerned, several cases are possible:
- reverse (Poller-initiated connection): the agent accepts connections from the poller. The agent needs a file containing the private key and a file containing the certificate (public key). Please note that the CN field in the certificate must match the name that will be used by the poller to connect to the host. For example, if you have entered myhostname in the CN, the poller must be able to connect to the host myhostname without using the IP address (a solution if myhostname is not in the DNS: add the IP myhostname mapping in the /etc/hosts file).
- not reverse: the agent connects to the poller
You have two solutions for the certificate:
- You have stored the poller's certificate in the Certificate Store, you have no file to fill in for the public key.
- Otherwise, you need to provide the path to the file containing the public key of the poller's opentelemetry server. As with reverse mode, the DNS name that the agent will use to connect to the poller must be identical to the CN of the certificate. If this is not possible, you can add an IP collector_host_name mapping in the C:\Windows\System32\drivers\etc\hosts file.
Deploy the Centreon plugin​
The Centreon plugin will execute the checks on the host.
- Linux
- Windows
Enable our plugins repository and install the plugin​
This repository will provide you our packaged plugins as well as the dependencies that are not available in the standard distribution repositories.
- Alma / RHEL / Oracle Linux 8
- Alma / RHEL / Oracle Linux 9
- Debian 11 & 12
dnf -y install dnf-plugins-core oracle-epel-release-el8
dnf config-manager --set-enabled ol8_codeready_builder
cat >/etc/yum.repos.d/centreon-plugins.repo <<'EOF'
[centreon-plugins-stable]
name=Centreon plugins repository.
baseurl=https://packages.centreon.com/rpm-plugins/el8/stable/$basearch/
enabled=1
gpgcheck=1
gpgkey=https://yum-gpg.centreon.com/RPM-GPG-KEY-CES
module_hotfixes=1
[centreon-plugins-stable-noarch]
name=Centreon plugins repository.
baseurl=https://packages.centreon.com/rpm-plugins/el8/stable/noarch/
enabled=1
gpgcheck=1
gpgkey=https://yum-gpg.centreon.com/RPM-GPG-KEY-CES
module_hotfixes=1
[centreon-plugins-testing]
name=Centreon plugins repository. (UNSUPPORTED)
baseurl=https://packages.centreon.com/rpm-plugins/el8/testing/$basearch/
enabled=0
gpgcheck=1
gpgkey=https://yum-gpg.centreon.com/RPM-GPG-KEY-CES
module_hotfixes=1
[centreon-plugins-testing-noarch]
name=Centreon plugins repository. (UNSUPPORTED)
baseurl=https://packages.centreon.com/rpm-plugins/el8/testing/noarch/
enabled=0
gpgcheck=1
gpgkey=https://yum-gpg.centreon.com/RPM-GPG-KEY-CES
module_hotfixes=1
[centreon-plugins-unstable]
name=Centreon plugins repository. (UNSUPPORTED)
baseurl=https://packages.centreon.com/rpm-plugins/el8/unstable/$basearch/
enabled=0
gpgcheck=1
gpgkey=https://yum-gpg.centreon.com/RPM-GPG-KEY-CES
module_hotfixes=1
[centreon-plugins-unstable-noarch]
name=Centreon plugins repository. (UNSUPPORTED)
baseurl=https://packages.centreon.com/rpm-plugins/el8/unstable/noarch/
enabled=0
gpgcheck=1
gpgkey=https://yum-gpg.centreon.com/RPM-GPG-KEY-CES
module_hotfixes=1
EOF
Install the plugin:
dnf install -y centreon-plugin-Operatingsystems-Linux-Local.noarch
dnf install dnf-plugins-core
dnf install epel-release
dnf config-manager --set-enabled crb
cat >/etc/yum.repos.d/centreon-plugins.repo <<'EOF'
[centreon-plugins-stable]
name=Centreon plugins repository.
baseurl=https://packages.centreon.com/rpm-plugins/el9/stable/$basearch/
enabled=1
gpgcheck=1
gpgkey=https://yum-gpg.centreon.com/RPM-GPG-KEY-CES
module_hotfixes=1
[centreon-plugins-stable-noarch]
name=Centreon plugins repository.
baseurl=https://packages.centreon.com/rpm-plugins/el9/stable/noarch/
enabled=1
gpgcheck=1
gpgkey=https://yum-gpg.centreon.com/RPM-GPG-KEY-CES
module_hotfixes=1
[centreon-plugins-testing]
name=Centreon plugins repository. (UNSUPPORTED)
baseurl=https://packages.centreon.com/rpm-plugins/el9/testing/$basearch/
enabled=0
gpgcheck=1
gpgkey=https://yum-gpg.centreon.com/RPM-GPG-KEY-CES
module_hotfixes=1
[centreon-plugins-testing-noarch]
name=Centreon plugins repository. (UNSUPPORTED)
baseurl=https://packages.centreon.com/rpm-plugins/el9/testing/noarch/
enabled=0
gpgcheck=1
gpgkey=https://yum-gpg.centreon.com/RPM-GPG-KEY-CES
module_hotfixes=1
[centreon-plugins-unstable]
name=Centreon plugins repository. (UNSUPPORTED)
baseurl=https://packages.centreon.com/rpm-plugins/el9/unstable/$basearch/
enabled=0
gpgcheck=1
gpgkey=https://yum-gpg.centreon.com/RPM-GPG-KEY-CES
module_hotfixes=1
[centreon-plugins-unstable-noarch]
name=Centreon plugins repository. (UNSUPPORTED)
baseurl=https://packages.centreon.com/rpm-plugins/el9/unstable/noarch/
enabled=0
gpgcheck=1
gpgkey=https://yum-gpg.centreon.com/RPM-GPG-KEY-CES
module_hotfixes=1
EOF
Install the plugin:
dnf install -y centreon-plugin-Operatingsystems-Linux-Local.noarch
apt update && apt install lsb-release ca-certificates apt-transport-https software-properties-common wget gnupg2 curl
wget -O- https://apt-key.centreon.com | gpg --dearmor | tee /etc/apt/trusted.gpg.d/centreon.gpg > /dev/null 2>&1
echo "deb https://packages.centreon.com/apt-plugins-stable/ $(lsb_release -sc) main" | tee /etc/apt/sources.list.d/centreon-plugins.list
apt-get update
Install the plugin:
apt -y install centreon-plugin-operatingsystems-linux-local
On the hosts you want to monitor, plugins is yet installed by the centreon monitoring agent installer.
Step 3: Monitoring a host with the CMA​
Create hosts using templates​
- Linux
- Windows
On the central server, create hosts and apply to them the OS-Linux-Centreon-Monitoring-Agent-custom template.
On the central server, create hosts and apply to them the OS-Windows-Centreon-Monitoring-Agent-custom template.