Windows WSMAN Configuration tutorial
Introduction
WS-Management (Web Services-Management) is a DMTF open standard defining a SOAP-based protocol for managing servers, devices, applications and various web services. WS-Management provides a common way for systems to access and exchange management information across the IT infrastructure.
WinRM configuration
- Local Configuration
- Domain Configuration
WSMAN configuration
On your Windows server, open PowerShell with administrator privileges and run the following commands.
Enable WinRM and allow remote access:
winrm quickconfig
Enable basic authentication:
winrm s winrm/config/service/auth '@{Basic="true"}'
Firewall configuration
- Open Server Manager.
- From the Tools menu, select Windows Defender Firewall with Advance Security.
- Click on Inbound Rules.
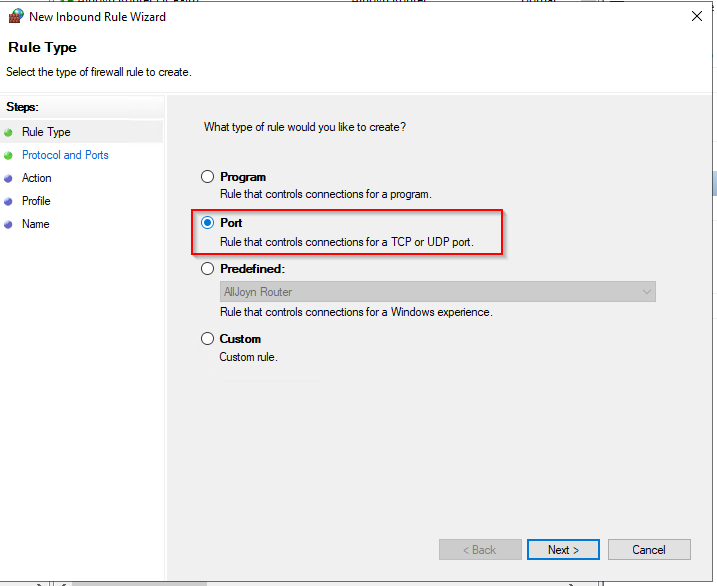
- Click on New Rule....
- Click on Port, then Next.
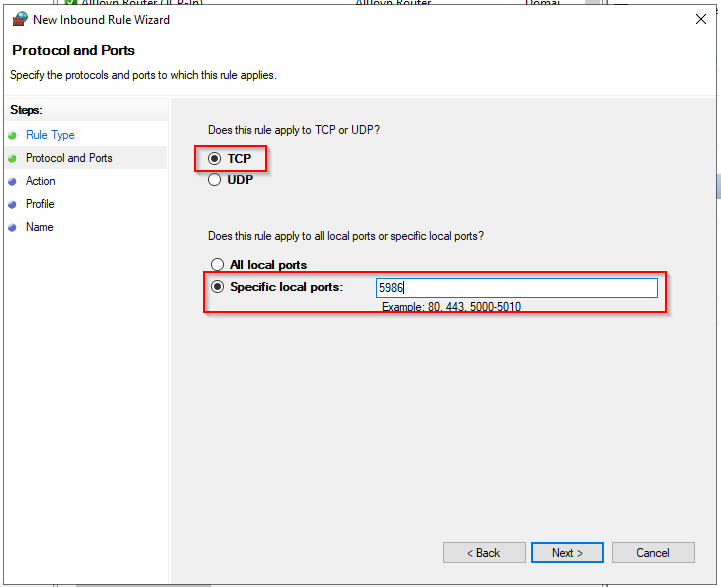
- Enter the value 5986 in the field for Specific local ports and click on Next.
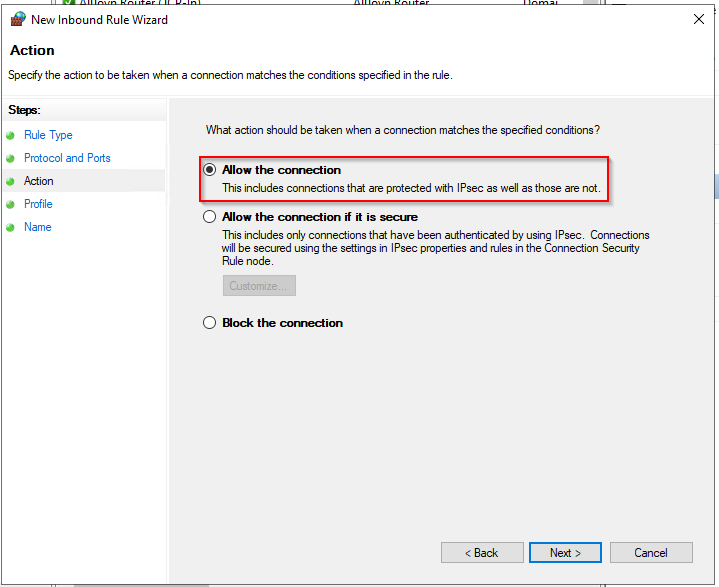
- Check that Allow the connection is selected, then click Next.
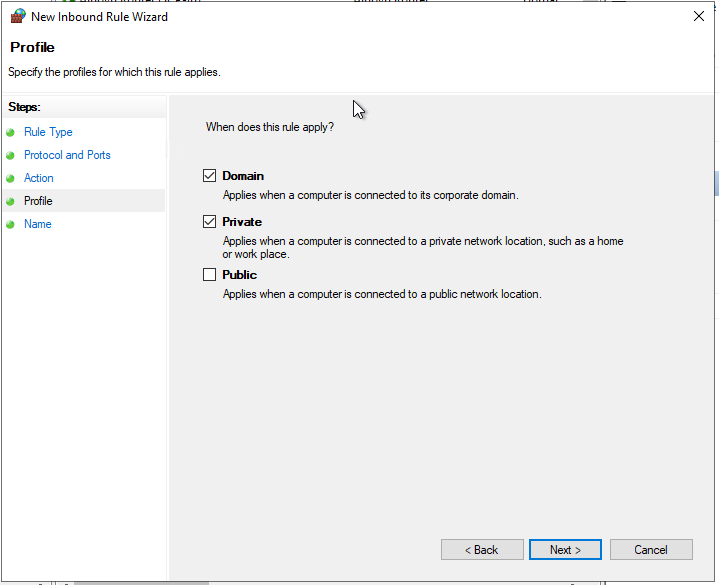
- On the next page, select the firewall profiles for which the rule should apply, and click Next.
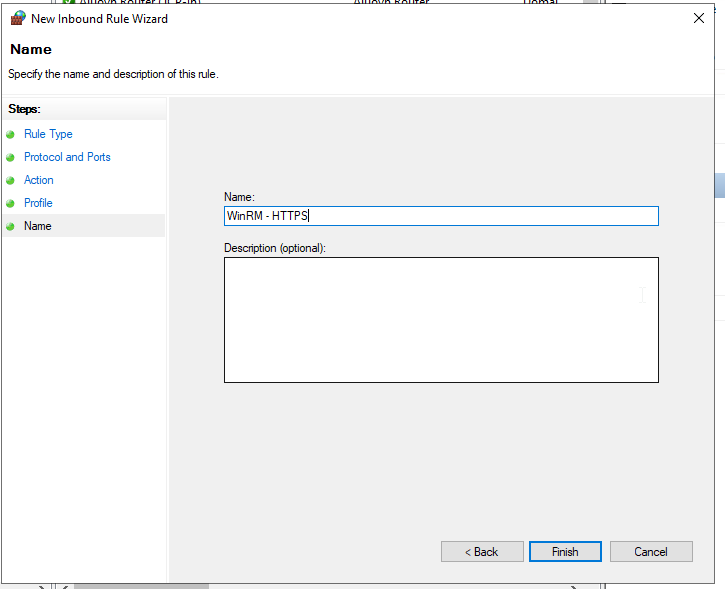
- On the next page, give the rule a name, and click Finish.
Create a self-signed certificate
Open PowerShell with administrator privileges and run the following command, replacing @HOSTNAME@ with the correct value.
New-SelfSignedCertificate -Subject 'CN=@HOSTNAME@' -TextExtension '2.5.29.37={text}1.3.6.1.5.5.7.3.1'
Copy the Thumbprint for the next step:

Create the WinRM HTTPS listener by replacing the values @HOSTNAME@ and @THUMBPRINT@ with the correct values.
winrm create winrm/config/Listener?Address=*+Transport=HTTPS '@{Hostname="@HOSTNAME@";CertificateThumbprint="@THUMBPRINT@"}'
From here, you can monitor your Windows server by using the local administrator account.
We strongly discourage the utilization of an administrator account within Centreon.
Dedicated user configuration
This section describes how to configure a local user and minimum privileges to monitor your server.
Create user
Open a PowerShell with administrator privileges.
Create your user:
net user @USERNAME@ @PASSWORD@ /add
Group configuration
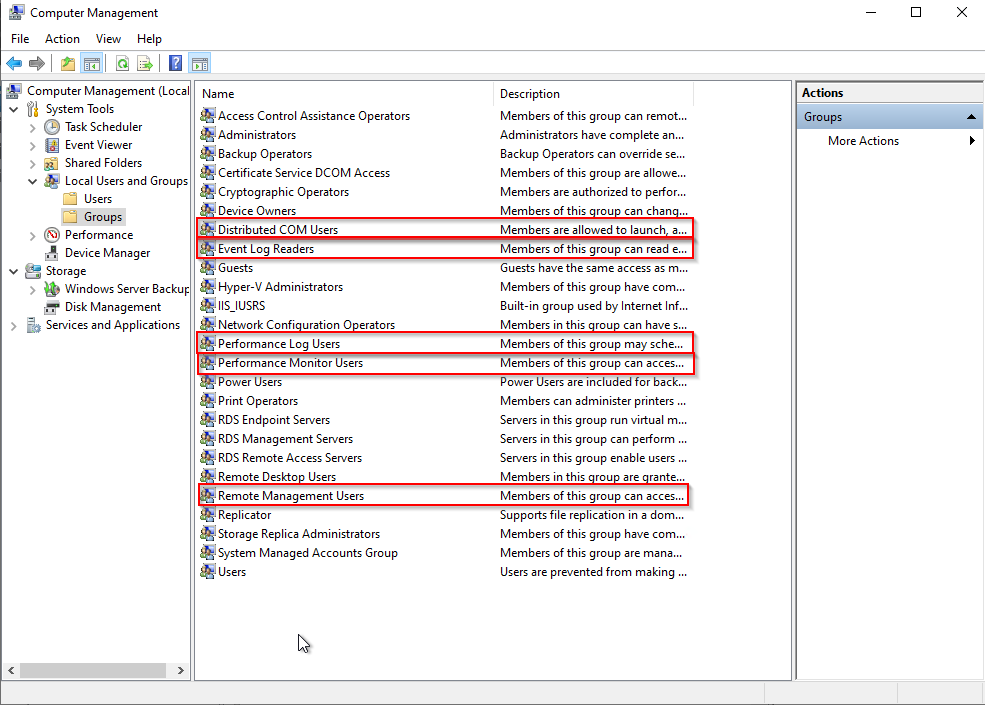
Open Computer Management and add your user to the following groups:
-
Distributed COM Users
-
Event Log Readers
-
Performance Log Users
-
Performance Monitor Users
-
Remote Management Users.
WMI access configuration
In PowerShell, run the following command:
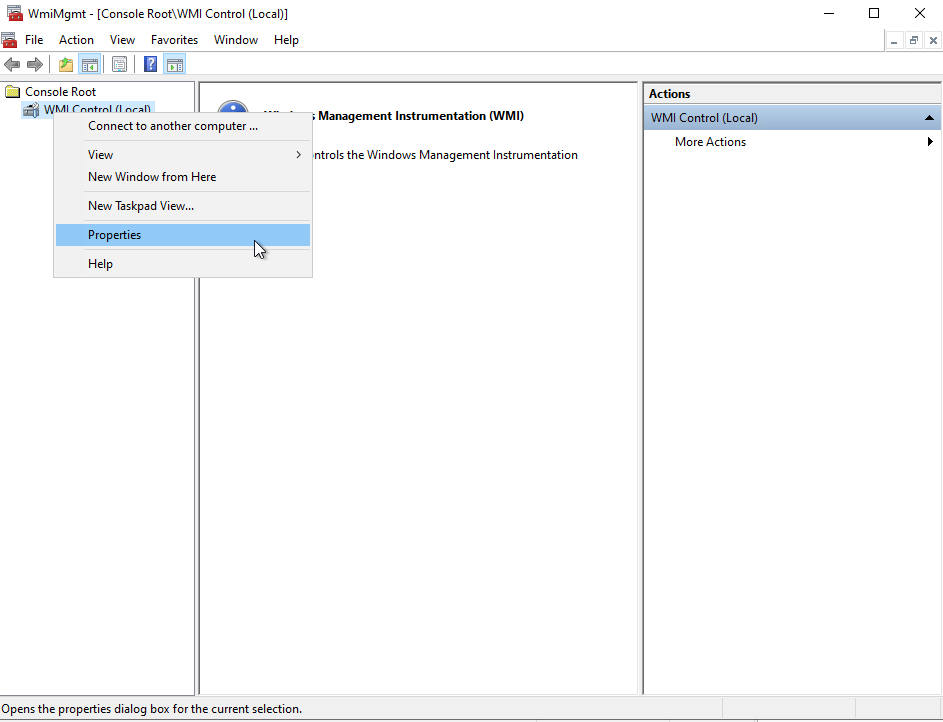
WMImgmt.msc
Right-click on WMI Control, then on Properties:
Click on Security:

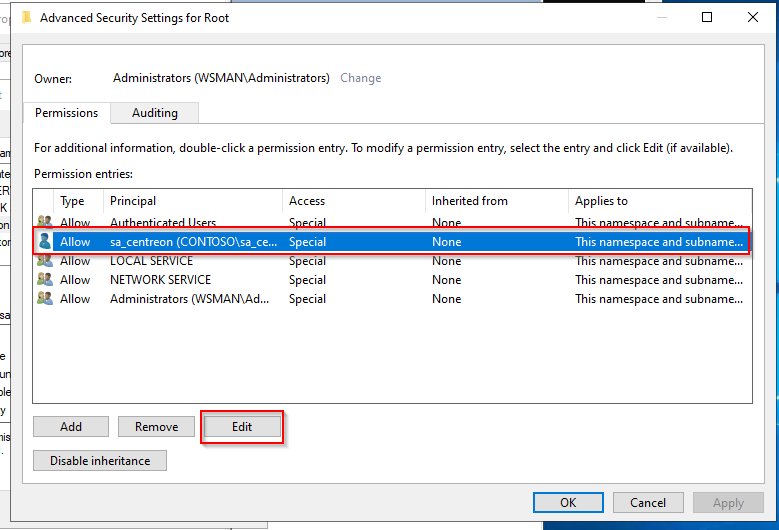
Select Root and click on Security:

Click on Add..., select the Remote Management Users group and set the following permissions:
- Enable Account
- Remote Enable
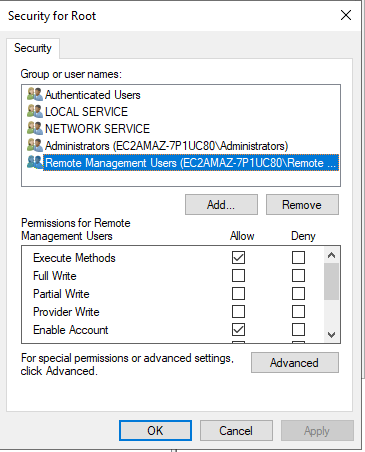
Click on Apply and OK
The permissions are not applied recursively, so you will have to repeat the previous process on the following directories:
- Root
- Root/CIMV2
- Root/DEFAULT
- Root/RSOP
- Root/RSOP/Computer
- Root/WMI
- Root/CIMv2/Security/MicrosoftTpm
Click Apply and OK. Close the WMImgmt.WMI window.
Allow script execution
In PowerShell, run the following command:
winrm configSDDL default
Add the Remote Management Users group. Set the following rights:
- Read(Get,Enumerate,Subscribe)
- Execute(Invoke)
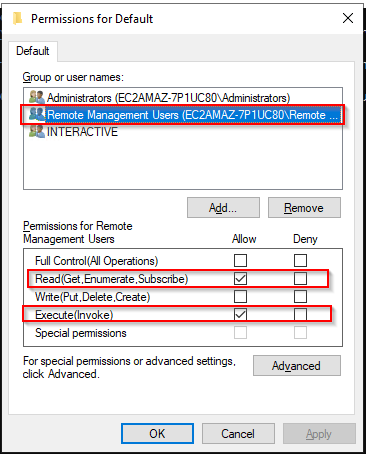
Click Apply and OK.
Grant permissions for services
Retrieve the user SID
Run the following command in PowerShell, replacing the value @USERNAME@ with the correct value.
wmic useraccount where name="@USERNAME@" get name,sid
Output:
Name SID
@USRNAME@ S-1-5-21-3051596711-3341658857-577043467-1000
Retrieve current SDDL for Service Control Manager
From a Windows Command Prompt (cmd), run the following command:
sc sdshow scmanager
Your SDDL looks something like this:
D:(A;;CC;;;AU)(A;;CCLCRPRC;;;IU)(A;;CCLCRPRC;;;SU)(A;;CCLCRPWPRC;;;SY)(A;;KA;;;BA)(A;;CC;;;AC)(A;;CC;;;S-1-15-3-1024-528118966-3876874398-709513571-1907873084-3598227634-3698730060-278077788-3990600205)S:(AU;FA;KA;;;WD)(AU;OIIOFA;GA;;;WD)
Modify SDDL
Copy this output and add the following section in the D: section just before the S: one: (A;;CCLCRPRC;;;@USERSID@).
In this example, the SDDL is now looking like this:
D:(A;;CC;;;AU)(A;;CCLCRPRC;;;IU)(A;;CCLCRPRC;;;SU)(A;;CCLCRPWPRC;;;SY)(A;;KA;;;BA)(A;;CC;;;AC)(A;;CC;;;S-1-15-3-1024-528118966-3876874398-709513571-1907873084-3598227634-3698730060-278077788-3990600205)(A;;CCLCRPRC;;;S-1-5-21-3051596711-3341658857-577043467-1000)S:(AU;FA;KA;;;WD)(AU;OIIOFA;GA;;;WD)
Set security credentials for accessing the Service Control Manager
In your Windows Command Prompt (cmd) run the following command, replacing @NEWSDDL@ with the correct value:
sc sdset scmanager "@NEWSDDL@"
In this example:
sc sdset scmanager "D:(A;;CC;;;AU)(A;;CCLCRPRC;;;IU)(A;;CCLCRPRC;;;SU)(A;;CCLCRPWPRC;;;SY)(A;;KA;;;BA)(A;;CC;;;AC)(A;;CC;;;S-1-15-3-1024-528118966-3876874398-709513571-1907873084-3598227634-3698730060-278077788-3990600205)(A;;CCLCRPRC;;;S-1-5-21-3051596711-3341658857-577043467-1000)S:(AU;FA;KA;;;WD)(AU;OIIOFA;GA;;;WD)"
Your dedicated user is now working and can monitor your Windows server without requiring a local Administrator account.
Note: The SDDL must be configured for
scmanagerand for all the extra services that you want to monitor.
For this procedure, we will assume that your Active Directory is properly configured and that a root certificate is available on each server.
Enable & configure WinRM through a GPO
- Open the Group Policy Manager.
- Extend Forest > Domains > @DOMAIN_NAME@.
- Right-click on @DOMAIN_NAME@ and click on Create a GPO in this domain, and link it here....
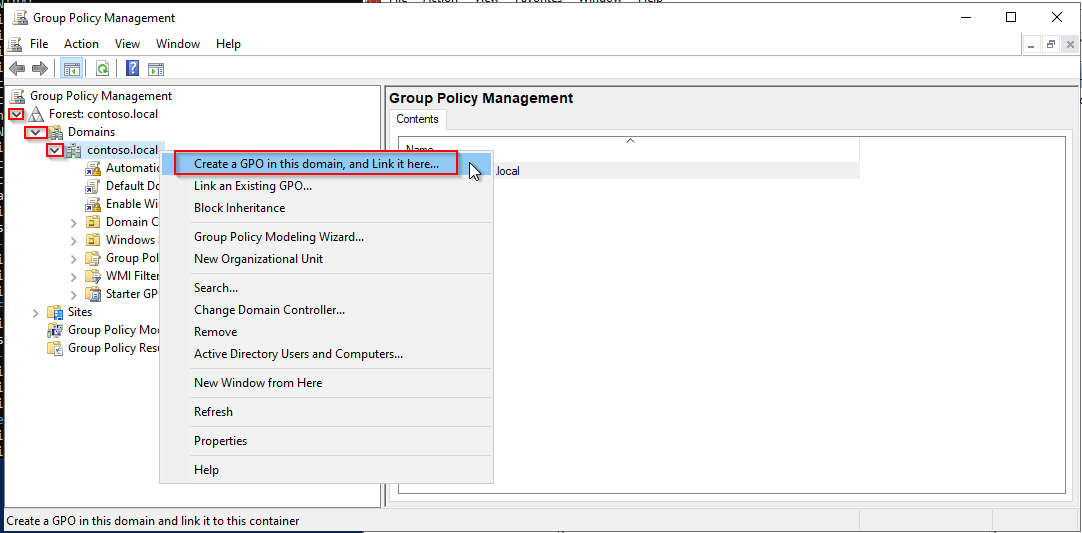
- Name your GPO. In this example, we will name it Enable WinRM.
- Right-click on the new GPO, Enable WinRM, and click on Edit....
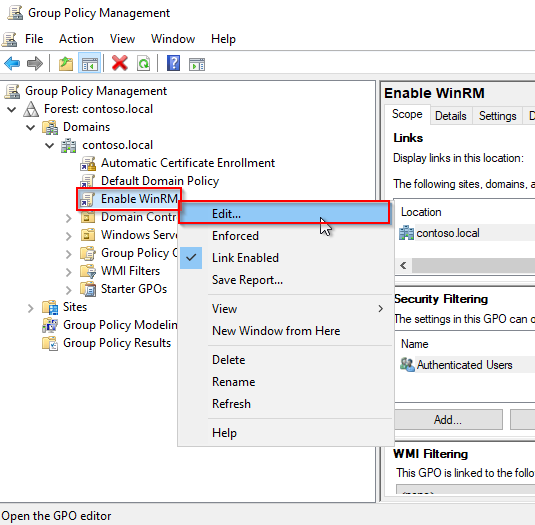
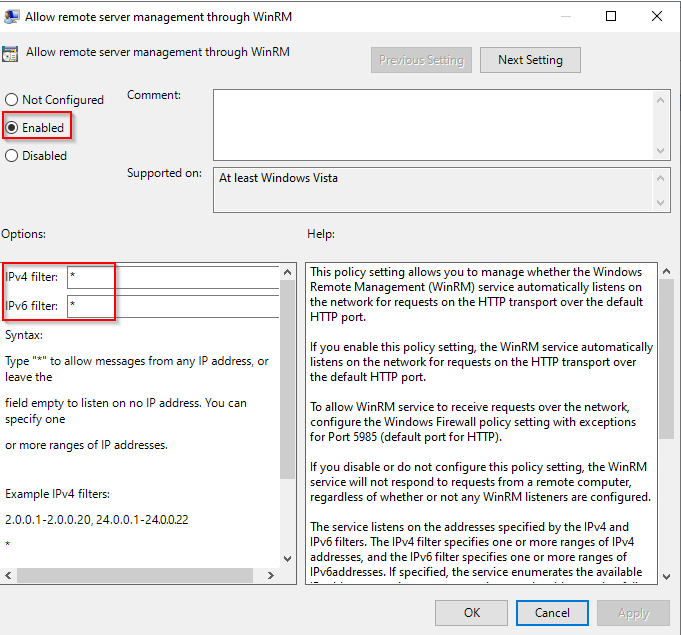
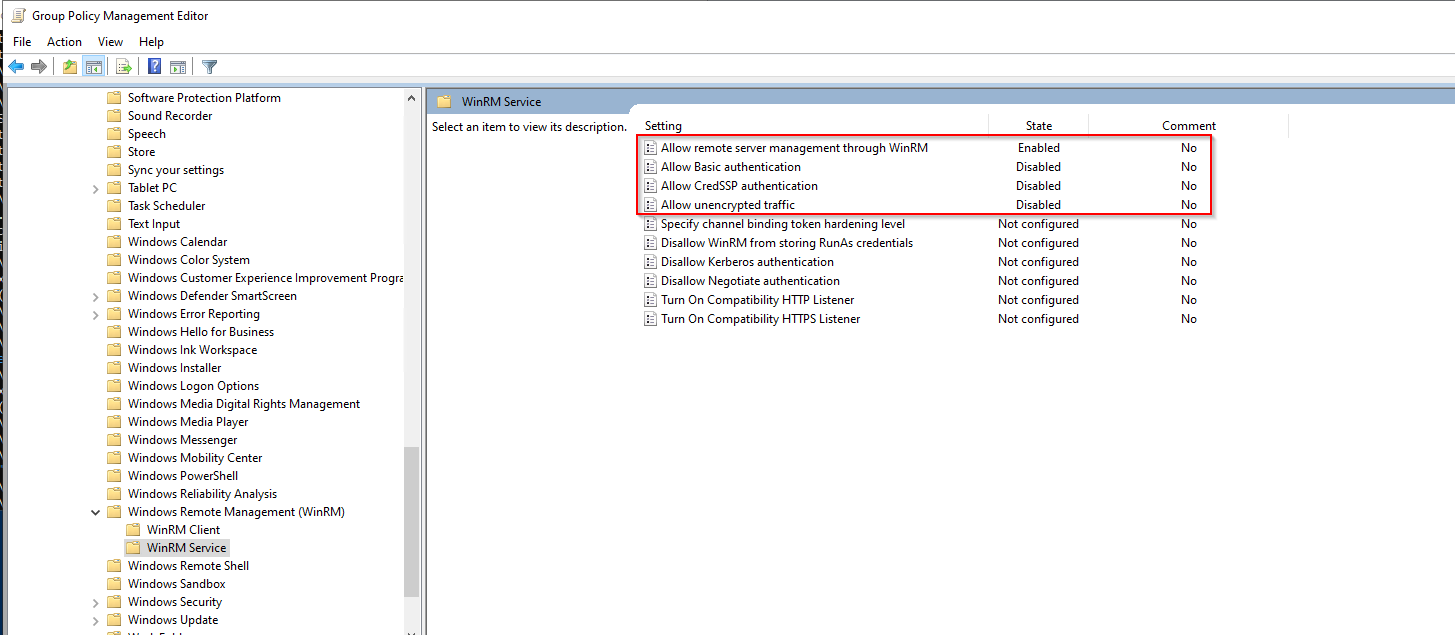
- In the Group Policy Management Editor menu, go to Computer Configuration > Policies > Administrative Templates > Windows Components > Windows Remote Management (WinRM) > WinRM Service.
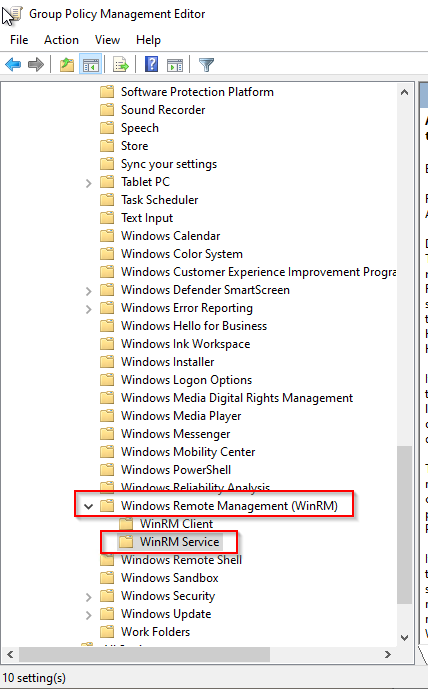
- Enable the rule Allow remote server management through WinRM.
- Add "*" in IPv4 filter and IPv6 filter.
-
Disable the following rules:
- Allow Basic authentication
- Allow CredSSP authentication
- Allow unencrypted traffic
The result must look like this:
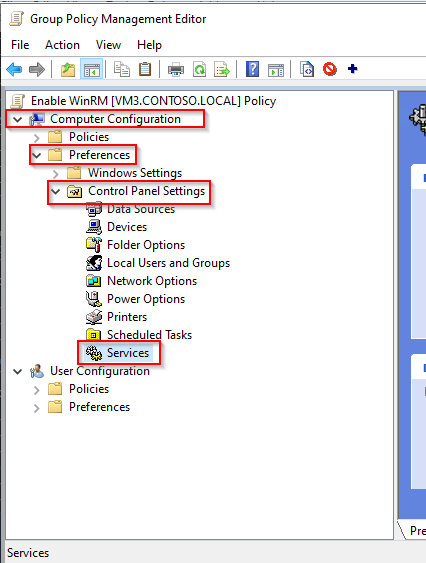
Automatically start the WinRM service through a GPO
In the same Enable WinRM GPO rule:
- Go to Computer Configuration > Preferences > Control Panel Settings > Services.
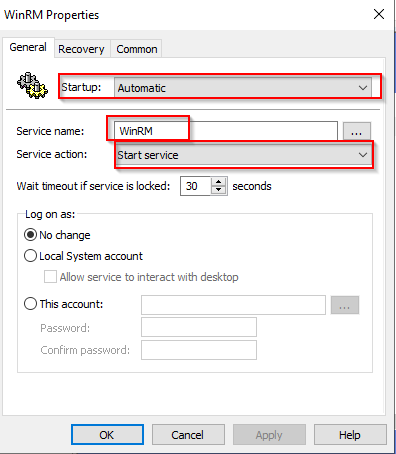
- Right-click in the right panel, then select New and Service.
- In Startup, select Automatic.
- In Service name, type WinRM.
- In Service action, select Start service.
- Click OK.
Configure an HTTPS WSMAN firewall rule through a GPO
In the same Enable WinRM GPO rule:
- Go to Computer Configuration > Policies > Windows Settings > Security Settings > Windows Defender Firewall with Advanced Security > Windows Defender > Inbound Rules:
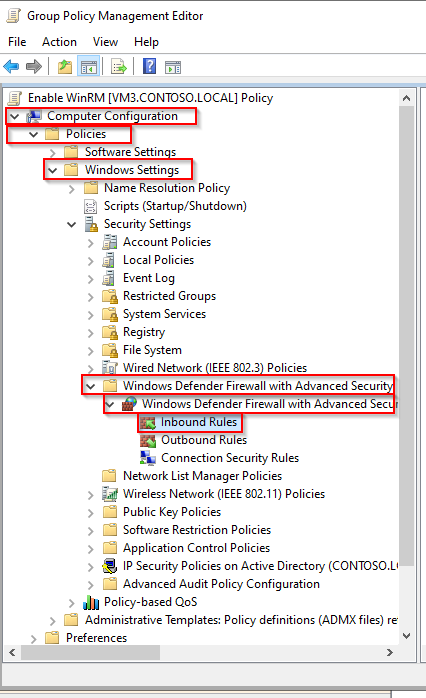
- Right-click in the right panel, then click on New Rule...
- Click on Port, then on Next.
- Enter the value 5986 in the field for Specific local ports and click on Next.
- Check that Allow the connection is selected, then click Next.
- On the next page, select the firewall profiles for which the rule should apply, and click Next.
- On the next page, give the rule a name, then click Finish.
Create an auto-enroll certificate template
Certificate Server
- Open the Certification Authority manager.
- Extend the left panel, right-click on Certificate Templates, then Manage.
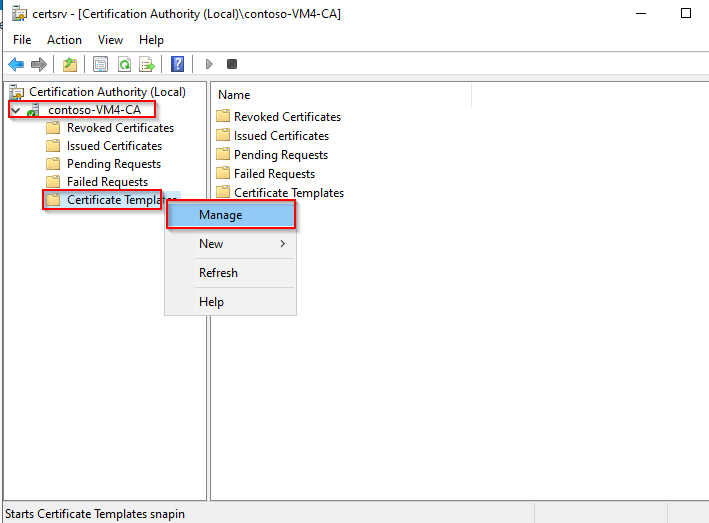
-
Right-click on the Web Server template, then on Duplicate Template.
-
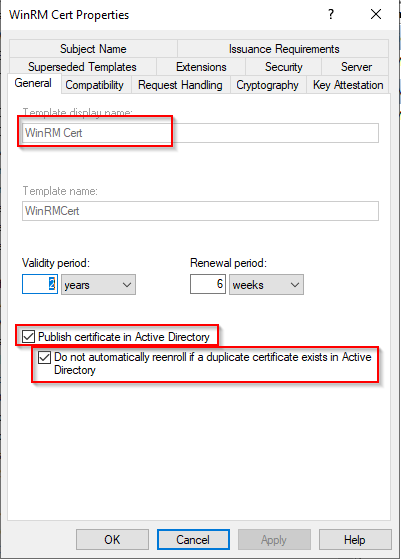
On the General tab, name your template and check the following boxes:
- Publish certificate in Active Directory
- Do not automatically reenroll...
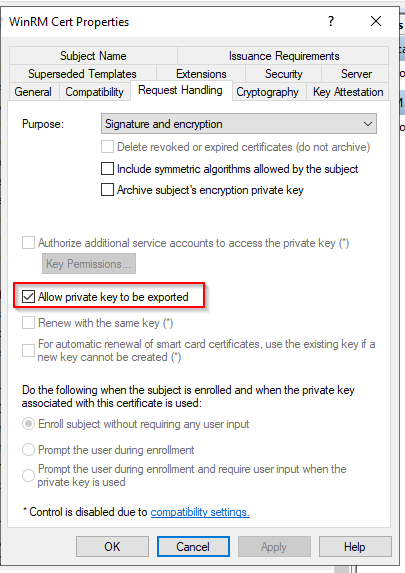
- Go to the Request Handling tab.
- Check the option Allow private key to be exported.
-
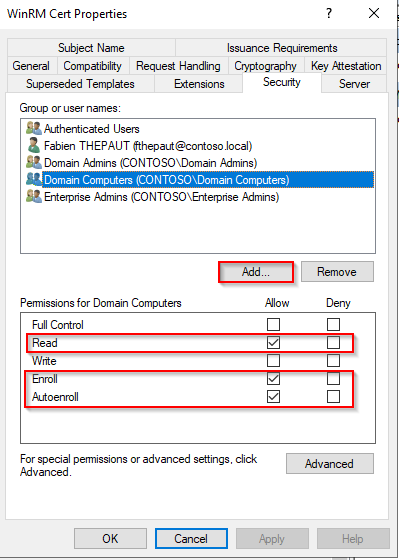
Go to the Security tab.
-
Click on Add..., then type Domain Computers
-
Set the following permissions:
- Read
- Enroll
- Autoenroll.
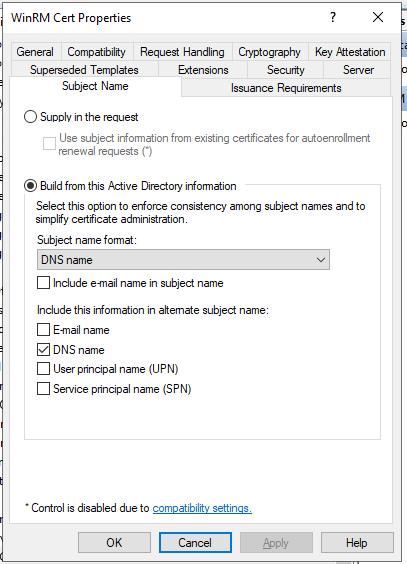
- Go to the Subject Name tab.
- Configure as shown below:
- Click on OK and close the Certificate Template Console.
- In the crtsrv window, right-click on Certificate Templates, then click New and Certificate Template to Issue.
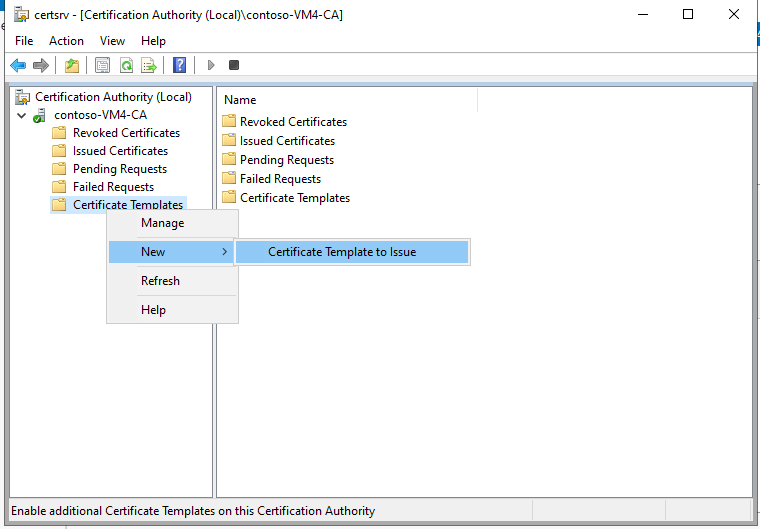
- Select the previously created WinRM Cert template, then click on OK.
- Close the certsrv window.
Active Directory Server
If an autoenroll GPO is already configured on your domain, you can skip that part.
- In the Group Policy Manager, create a new policy for the autoenrollment.
- Right-click on this policy, then click on Edit...
- In the Group Policy Management Editor, go to Computer Configuration > Policies > Windows Settings > Security Settings > Public Key Policies.
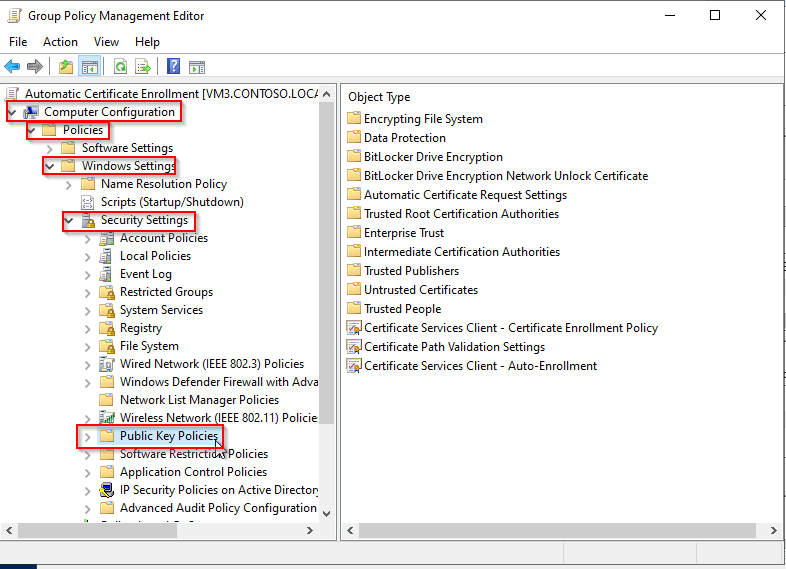
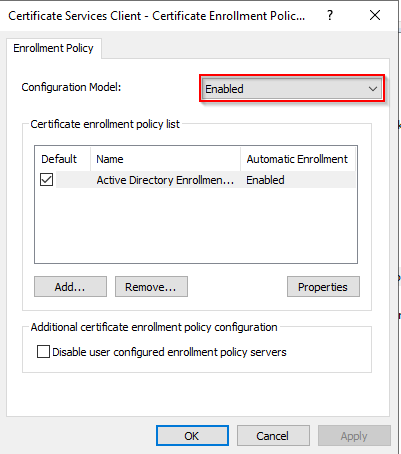
- Double-click on Certificate Service Client - Certificate Enrollment Policy.
- Set Configuration Model to Enabled.
- Click OK.
-
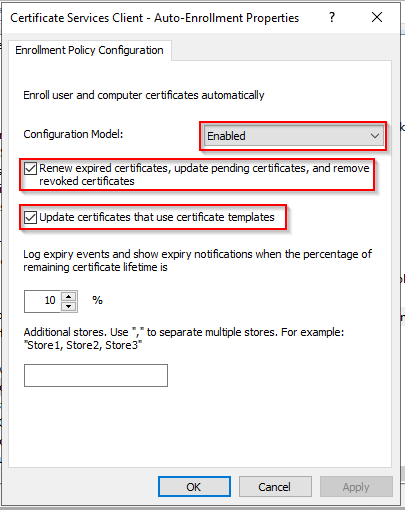
Double-click on Certificate Services Client - Auto-Enrollment.
-
Set Configuration Model to Enabled.
-
Check the following options:
- Renew expired certificates...
- Update certificates...
-
Click on OK.
- Close the Group Policy Manager Editor.
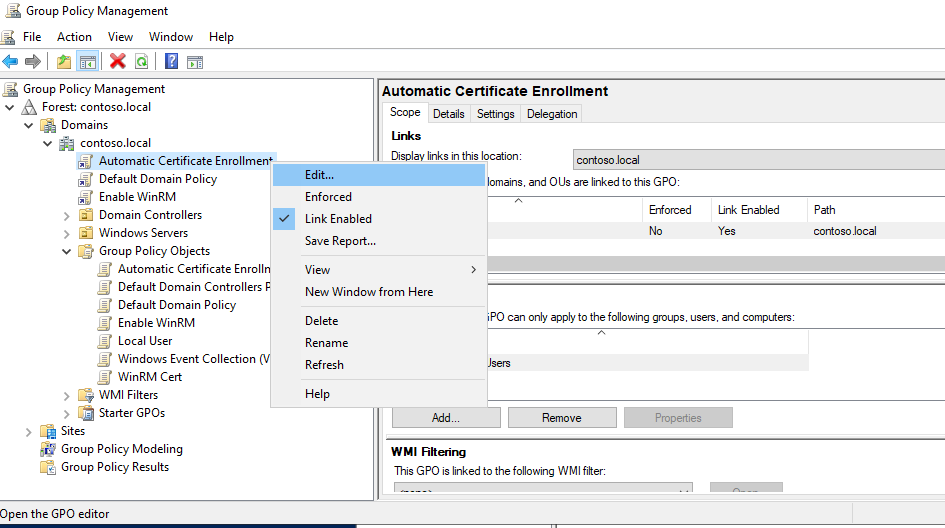
- In Group Policy Mangement, right-click on the Auto-Enrollment policy and click on Enforced.
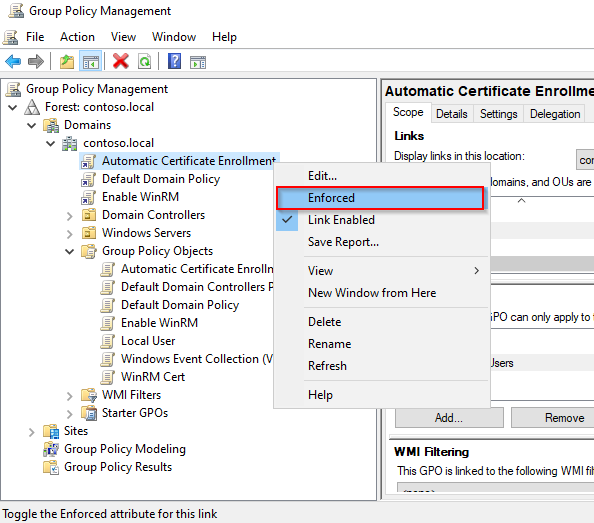
- Also, set the Enable WinRM rule to Enforced.
A dedicated certificate will be issued for each server that is part of your domain. These certificates will be used to encrypt the communication between Centreon and your Windows servers by using WSMAN and the HTTPS protocol.
Deploy the script
To link this certificate to the WinRM service, you will have to run the following PowerShell (.ps1) script on each server. It can be done through a GPO or locally on each server.
Create the "WinRM-HTTPS.ps1" script on your Domain Controller.
Script:
$FQDN=$(($i=[System.Net.Dns]::GetHostByName($env:computerName))).HostName

$Thumbprint=Invoke-Command -ComputerName $FQDN `
                             -ScriptBlock {
                                Get-ChildItem -Path Cert:\LocalMachine\My |
                                Where-Object{($TmplExt = $_.Extensions |Where-Object {$_.Oid.FriendlyName -match 'Certificate Template'}) -and $TmplExt.format(0) -match 'WinRM'} |
                                Sort-Object -Property NotAfter |
                                Select-Object -Last 1 -ExpandProperty Thumbprint
                             }


Set-WSManInstance -ResourceURI winrm/config/Listener `
                  -SelectorSet @\{Address="*";Transport="HTTPS"\} `
                  -ComputerName $FQDN `
                  -ValueSet @\{CertificateThumbprint=$Thumbprint\}

winrm create winrm/config/Listener?Address=*+Transport=HTTPS "@\{Hostname=".$FQDN.".;CertificateThumbprint=".$Thumbprint."\}"
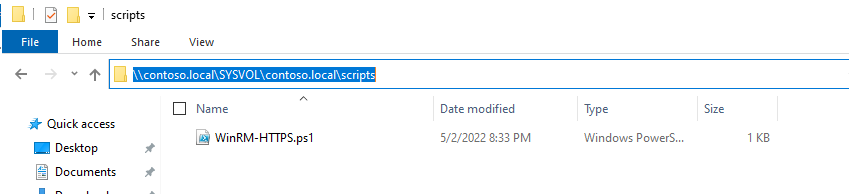
- Copy this script in the following location to be able to deploy it massively:
<DOMAIN_NAME>\SYSVOL<DOMAIN_NAME>\scripts
In our case it looks like this:
- Go back to your Enable WinRM policy.
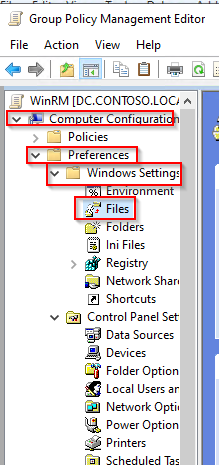
- Go to Computer Configuration > Preferences > Windows Settings > Files.
- Right-click in the right panel and select New > Files.
- Select the Source file(s) and Destination File
- In this example:
- Source file: \contoso.local\SYSVOL\contoso.local\scripts\WinRM-HTTPS.ps1
- Destination file: C:\Windows\Temp\WinRM-HTTPS.ps1
- In this example:

- Click Apply, then OK.
Create a scheduled task
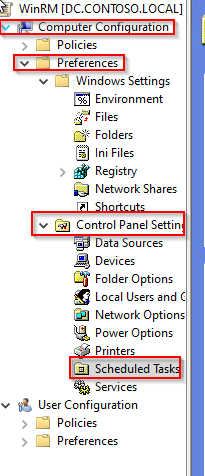
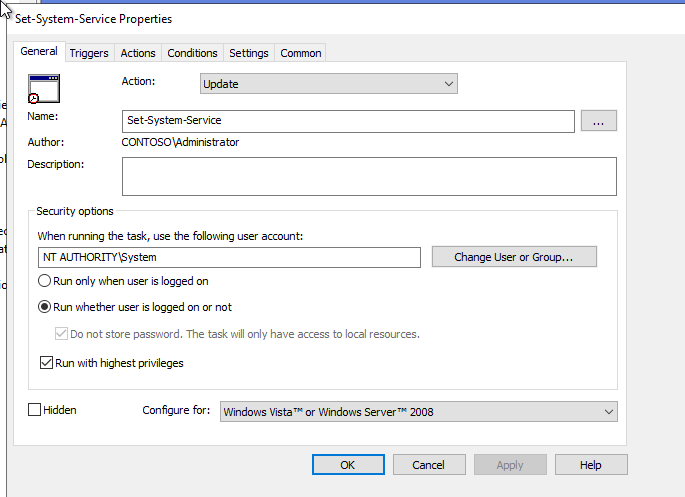
- Go to the Computer Configuration > Preferences > Control Panel Settings > Schedule Task menu.
- Right-click in the right panel and select New > Scheduled Task (At least Windows 7).
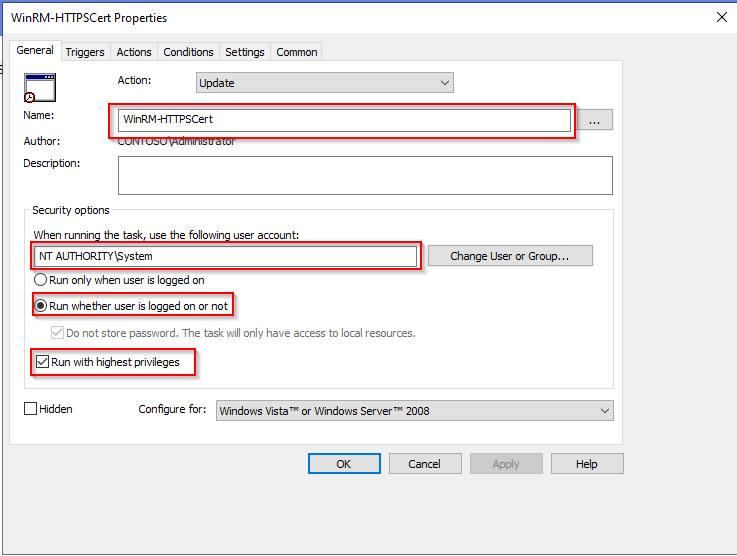
- Name your task.
- Select the user NT Authority\Systems.
- Select Run whether user is logged on or not.
- Check Run with highest privileges.
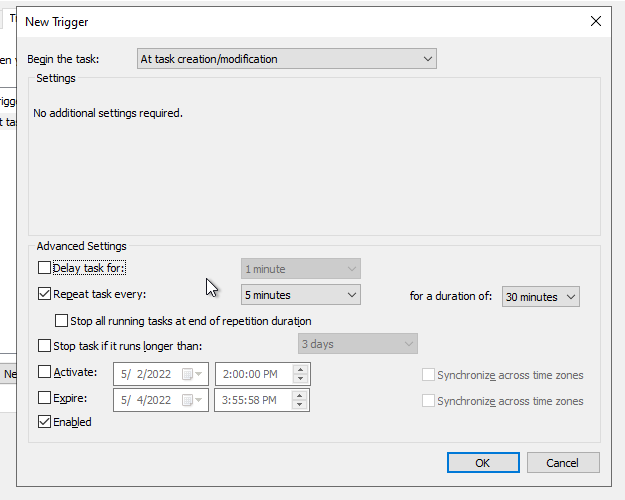
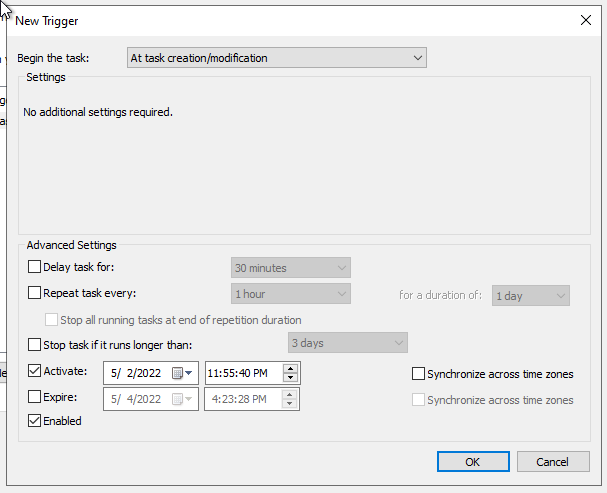
- Go to the Triggers tab.
- Add a new trigger.
- Select At task creation/modification.
- Check Repeat task every:
- Select 5 minutes.
- and For a duration of 30 minutes.
- Check Enabled.
- Click on OK.
The Repeat task parameter is necessary to take into account new servers joining the domain. Indeed, the script might get executed before the certificate gets issued. With that parameter, we ensure that the task will be executed at least once after the WinRM certificate is issued.
- Go to the Actions tab.
- Add a new action.
- Fill in the following settings:
- Action: Start a program.
- Program/script: PowerShell.exe.
- Add argument: -file C:\Windows\Temp\WinRM-HTTPS.ps1.
- Adjust this parameter to match with the "File destination" setting previously configured.

- Save the configuration.
Adapt the configuration to meet your needs.
If you don't mind authenticating with the domain Admin user, you can jump straight to the Kerberos section. Otherwise, you can continue following the documentation to set up a dedicated service user.
Configure service user
On your Active Directory server:
- Open Active Directory Users and Computers.
- In the left panel, select @DOMAIN NAME@ > Users.
- Right-click in the right panel and select New > User.

- Create your user.
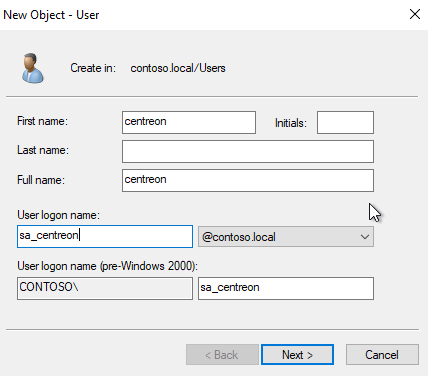
-
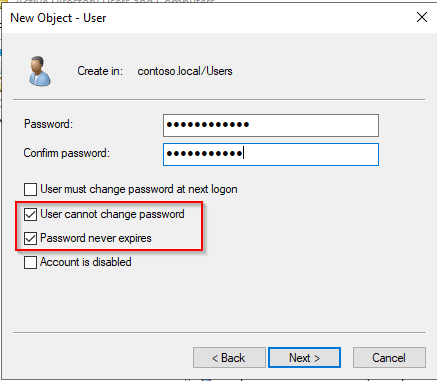
Set up the password.
-
Uncheck option User must change password at next logon.
-
Check the options:
- User cannot change password
- Password never expires
-
Click Next, then Finish.
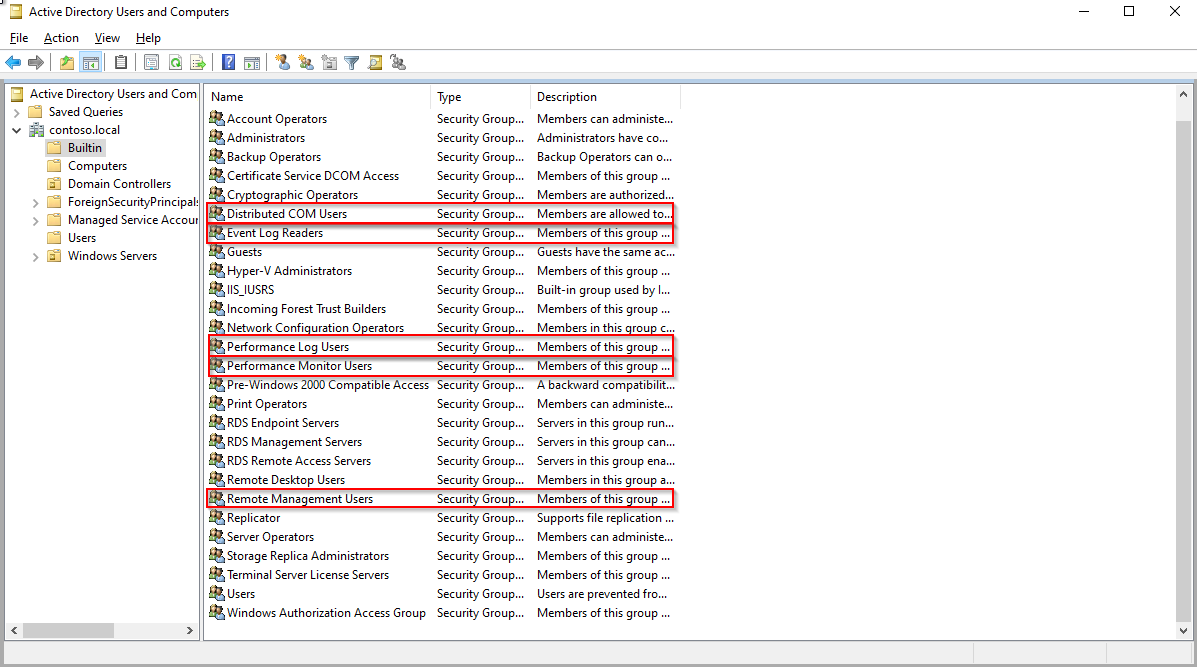
- In the left panel go to Builtin.
- Add the service user as a member of the following groups:
- Distributed COM Users
- Event Log Readers
- Performance Log Users
- Performance Monitor Users
- Remote Management Users.
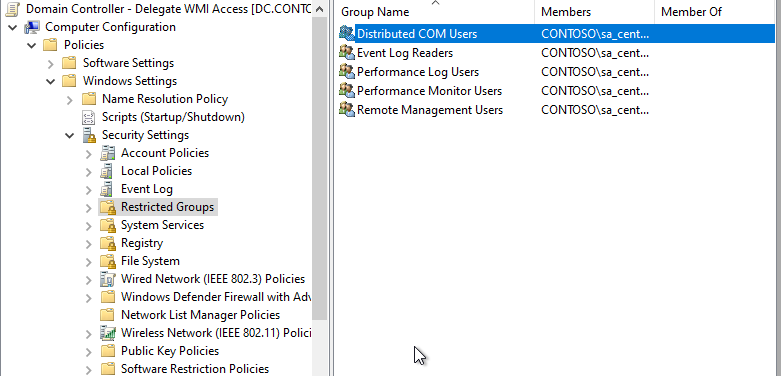
- Go back to the Group Policy Manager and edit the rule Enable WinRM.
- Go to Computer Configuration > Policies > Windows Settings > Security Settings > Restricted Groups.
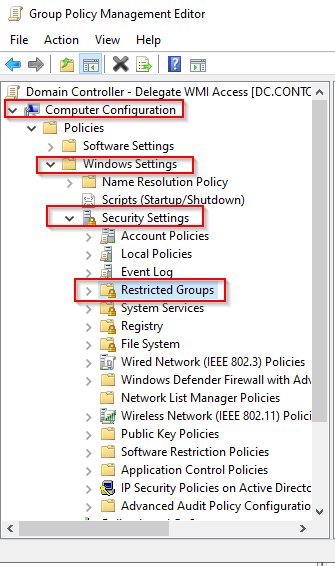
- Right-click on the right panel and click on Add Group....
- Click on Browse....
- Type Distributed COM Users, click on Check Names, then click on OK.
- Click on OK... again.
- Add your service user in the Member of this group: section.
- Click OK.

- Repeat the process for all builtin groups:
- Event Log Readers
- Performance Log Users
- Performance Monitor Users
- Remote Management Users.
When the configuration is done, it should look like that:
Configure WMI permissions
For this step, you will need to connect to one target server to configure adequate rights. Unfortunately, the WMI permission delegation can't be done through a GPO: this configuration needs to be done locally on each server. To apply that configuration massively, we will create a configuration template from one of your servers, then apply this template through a scheduled task on your servers.
In PowerShell, run the following command:
WmiMgmt.msc
Right-click on WMI Control, then on Properties.
Click on Security.
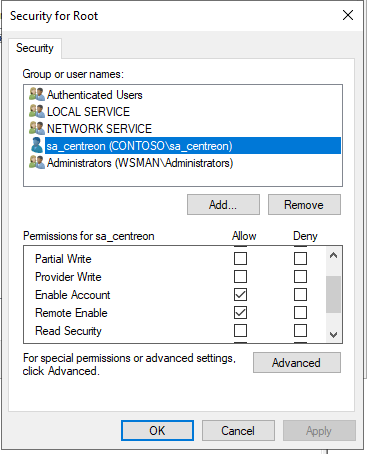
Select Root and click on Security.
Click on Add..., select the service user (here, sa_centreon), and allow the following permissions:
- Enable Account
- Remote Enable
To make things easier, we will add a permission on this namespace and all subnamespaces. If you want to allow each mandatory namespace manually, you'll have to create one dedicated template per namespace. Mandatory namspaces:
- Root
- Root/CIMV2
- Root/DEFAULT
- Root/RSOP
- Root/RSOP/Computer
- Root/WMI
- Root/CIMv2/Security/MicrosoftTpm.
- Click on Advanced.
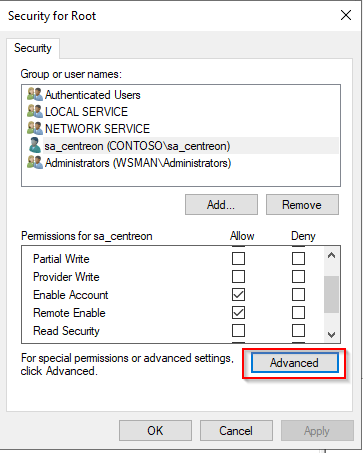
- Click on your service user, then on Edit.
- On the line Applies to:, select This namespace and all subnamespaces.
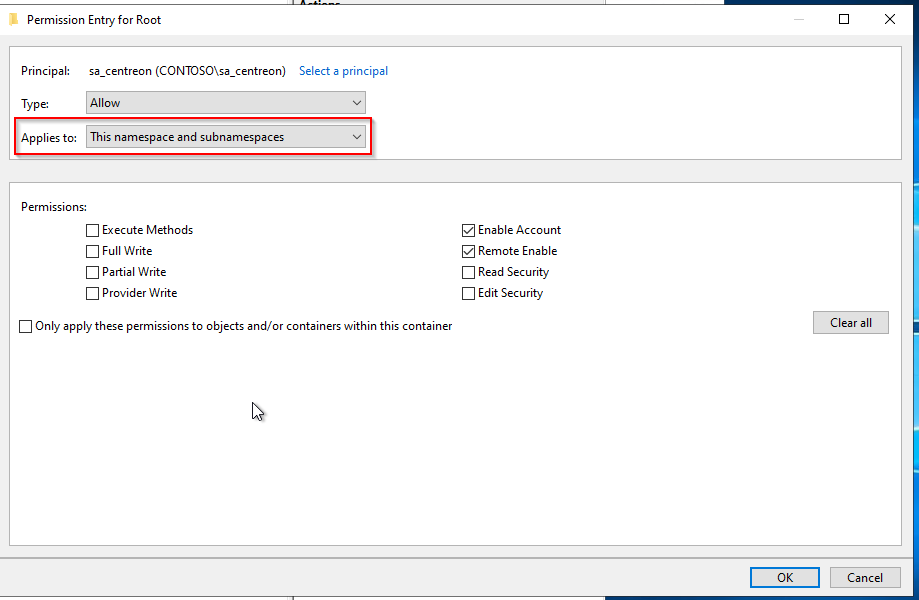
-
Click on OK for each open window.
-
Restart the service WinRM.
Create a WMI security template file
On the same server, run the following command in PowerShell:
$SidHelper = New-Object System.Management.ManagementClass Win32_SecurityDescriptorHelper
$SdList = @($null)
$(Get-WMIObject -Namespace "root" -Class __SystemSecurity).PsBase.InvokeMethod("GetSD",$SdList)

[System.Management.Automation.PSSerializer]::Serialize($SdList) | Set-Content sdlist.txt
You should now have a sdlist.txt file in your directory.
- Copy this file to your Domain Controller in the \contoso.local\SYSVOL\contoso.local\scripts directory.
Deploy the WMI security template through a GPO
On your Domain Controller, create the Set-WMINameSpaceSecurity.ps1 script:
$SdList = [System.Management.Automation.PSSerializer]::Deserialize($(Get-Content C:\Windows\Temp\sdlist.txt))

$SidHelper = New-Object System.Management.ManagementClass Win32_SecurityDescriptorHelper
$RootSecurity = $(Get-WMIObject -Namespace "root" -Class __SystemSecurity)
$RootSecurity.PsBase.InvokeMethod("SetSd",$SdList)
- Copy this script to the following location to be able to deploy this script massively.
<DOMAIN_NAME>\SYSVOL<DOMAIN_NAME>\scripts
-
Go back to your Enable WinRM policy.
-
Go to Computer Configuration > Preferences > Windows Settings > Files.
-
Right-click in the right panel and select New > Files.
-
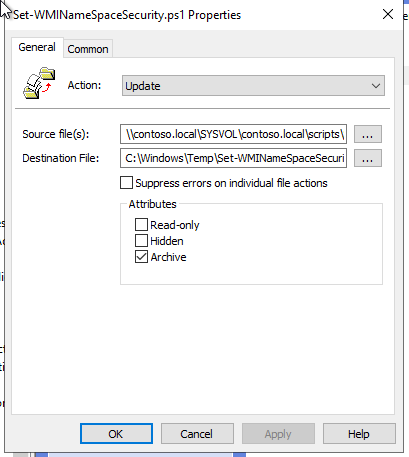
Select the Source file(s) and Destination File.
- In this example:
- Source file: \contoso.local\SYSVOL\contoso.local\scripts\Set-WMINameSpaceSecurity.ps1
- Destination file: C:\Windows\Temp\Set-WMINameSpaceSecurity.ps1
- In this example:
-
Click Apply and OK.
-
Repeat that process for the sdlist.txt file.
-
Select the Source file(s) and Destination File.
- In this example:
- Source file: \contoso.local\SYSVOL\contoso.local\scripts\sdlist.txt
- Destination file: C:\Windows\Temp\sdlist.txt
- In this example:

Execute the WMI security template through a GPO
- Go to the Computer Configuration > Preferences > Control Panel Settings > Schedule Task menu.
- Right-click in the right panel and select New > Scheduled Task (At least Windows 7).
- Name your task.
- Select the user NT Authority\Systems.
- Select Run whether user is logged on or not.
- Check Run with highest privileges.
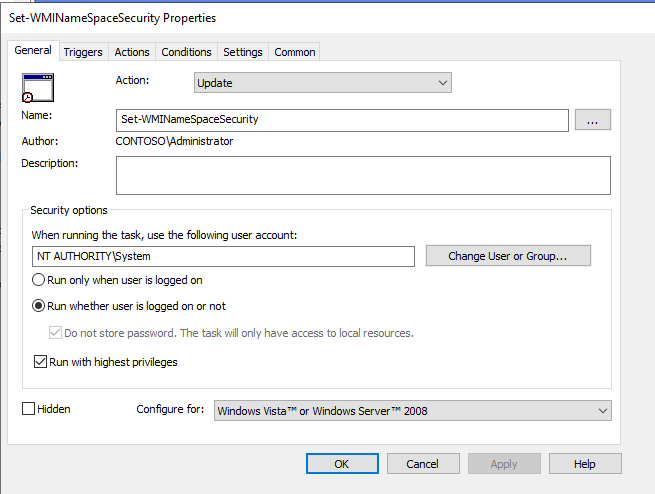
- Go to the Triggers tab.
- Add a new trigger.
- Select At task creation/modification.
- Check Enabled.
- Click on OK.
- Go to the Actions tab.
- Add a new action.
- Fill in the following settings:
- Action: Start a program
- Program/script: PowerShell.exe
- Add argument: -file C:\Windows\Temp\Set-WMINameSpaceSecurity.ps1
- Adjust this parameter to match with the "File destination" setting previously configured.

- Save the configuration.
Adapt the configuration to meet your needs.
Configure Services permissions
As in the previous section, permissions have to be managed locally on each server.
File deployment
On your Domain Controller, create the system-services.ps1 script:
# Query service manager to get the current permissions in SDDL format.
$command = @'
cmd.exe /C  sc sdshow scmanager
'@

$HostPermissions = Invoke-Expression -Command:$command

# Visually compare the two strings
Write-Host "  Host: " $HostPermissions

$NewPermission = $HostPermissions.replace('(A;;CC;;;AU)','(A;;CCLCRPRC;;;AU)')

Write-Host "New: $NewPermission"

$SetPermissionsCommand = @"
cmd.exe /C  sc sdset scmanager `"$($NewPermission)`"
"@

Invoke-Expression -Command:$SetPermissionsCommand
- Copy this script to the following location to be able to massively deploy it.
<DOMAIN_NAME>\SYSVOL<DOMAIN_NAME>\scripts
-
Go back to your Enable WinRM policy.
-
Go to Computer Configuration > Preferences > Windows Settings > Files.
-
Right-click in the right panel and select New > Files.
-
Select the Source file(s) and Destination File.
- In this example:
- Source file: \contoso.local\SYSVOL\contoso.local\scripts\system-services.ps1
- Destination file: C:\Windows\Temp\system-services.ps1.
- In this example:
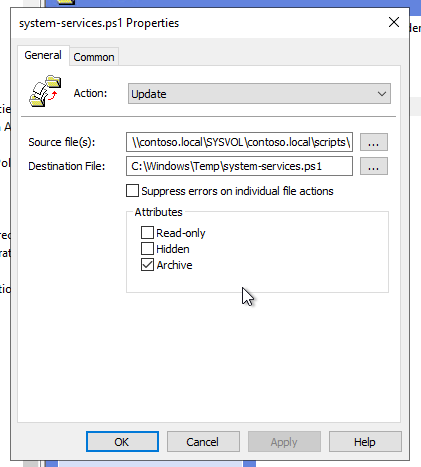
- Click Apply, then OK.
Schedule task creation
- Go to the Computer Configuration > Preferences > Control Panel Settings > Schedule Task menu.
- Right-click in the right panel and select New > Scheduled Task (At least Windows 7).
- Name your task.
- Select the user NT Authority\Systems.
- Select Run whether user is logged on or not.
- Check Run with highest privileges.
- Go to the Triggers tab.
- Add a new trigger.
- Select At task creation/modification.
- Check Enabled.
- Click on OK.
- Go to the Actions tab.
- Add a new action.
- Fill in the following settings:
- Action: Start a program
- Program/script: PowerShell.exe
- Add argument: -file C:\Windows\Temp\system-services.ps1
- Adjust this parameter to match with the "File destination" setting previously configured.

- Save the configuration.
Adapt the configuration to meet your needs.
Allow PowerShell command-line execution
As in the previous section, permissions have to be managed locally on each server.
File deployment
On your Domain Controler, create the "RootSDDL-Permision.ps1 script.
This script will set the Execution and Read permissions for your service user through WinRM.
$user = $args[0]

#Adding the below script should replace "winrm configSDDL default"
$GENERIC_READ = 0x80000000
$GENERIC_WRITE = 0x40000000
$GENERIC_EXECUTE = 0x20000000
$GENERIC_ALL = 0x10000000

# get SID of user/group to add

$user_sid = (New-Object -TypeName System.Security.Principal.NTAccount -ArgumentList $user).Translate([System.Security.Principal.SecurityIdentifier])

# get the existing SDDL of the WinRM listener
$sddl = (Get-Item -Path WSMan:\localhost\Service\RootSDDL).Value

# convert the SDDL string to a SecurityDescriptor object
$sd = New-Object -TypeName System.Security.AccessControl.CommonSecurityDescriptor -ArgumentList $false, $false, $sddl

# apply a new DACL to the SecurityDescriptor object
$sd.DiscretionaryAcl.AddAccess(
[System.Security.AccessControl.AccessControlType]::Allow,
$user_sid,
($GENERIC_READ -bor $GENERIC_EXECUTE),
[System.Security.AccessControl.InheritanceFlags]::None,
[System.Security.AccessControl.PropagationFlags]::None
)

# get the SDDL string from the changed SecurityDescriptor object
$new_sddl = $sd.GetSddlForm([System.Security.AccessControl.AccessControlSections]::All)

# apply the new SDDL to the WinRM listener
Set-Item -Path WSMan:\localhost\Service\RootSDDL -Value $new_sddl -Force
- Copy this script to the following location to be able to deploy it massively.
<DOMAIN_NAME>\SYSVOL<DOMAIN_NAME>\scripts
-
Go back to the Enable WinRM policy.
-
Go to Computer Configuration > Preferences > Windows Settings > Files.
-
Right-click in the right panel and select New > Files.
-
Select the Source file(s) and Destination File.
- In this example:
- Source file: \contoso.local\SYSVOL\contoso.local\scripts\RootSDDL-Permision.ps1
- Destination file: C:\Windows\Temp\RootSDDL-Permision.ps1.
- In this example:
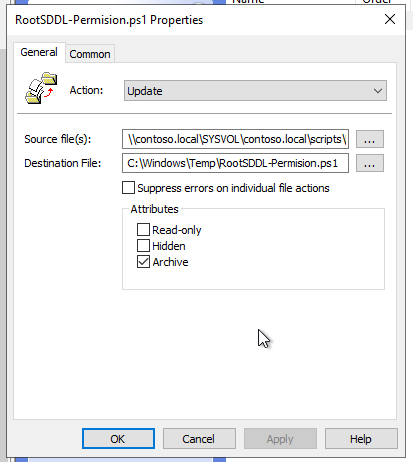
- Click Apply, then OK.
Schedule task creation
- Go to the Computer Configuration > Preferences > Control Panel Settings > Schedule Task menu.
- Right-click in the right panel and select New > Scheduled Task (At least Windows 7).
- Name your task.
- Select the user NT Authority\Systems.
- Select Run whether user is logged on or not.
- Check Run with highest privileges.
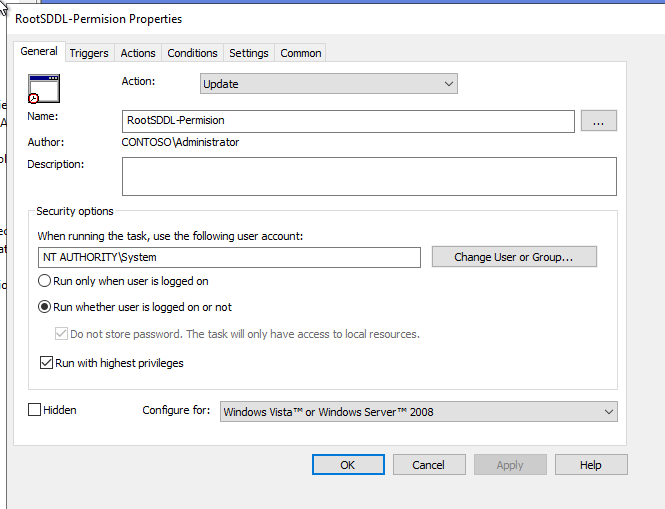
- Go to the Triggers tab.
- Add a new trigger.
- Select At task creation/modification.
- Check Enabled.
- Click on OK.
- Go to the Actions tab.
- Add a new action.
- Fill in the following settings:
- Action: Start a program
- Program/script: PowerShell.exe
- Add argument: -file C:\Windows\Temp\RootSDDL-Permision.ps1 @SERVICE_USERNAME@
- Adjust this parameter to match with the File destination setting previously configured.
- In our exemple the argument is **-file C:\Windows\Temp\RootSDDL-Permision.ps1 sa_centreon.
- Save the configuration.
Adapt the configuration to meet your needs.
File system permissions
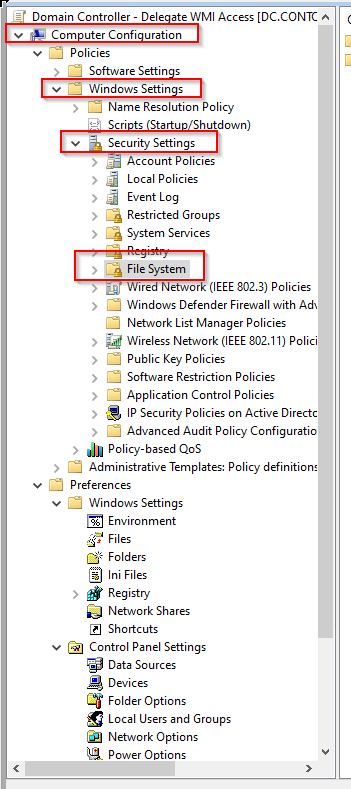
On your Domain Controller:
- Go back to your Enable WinRM policy.
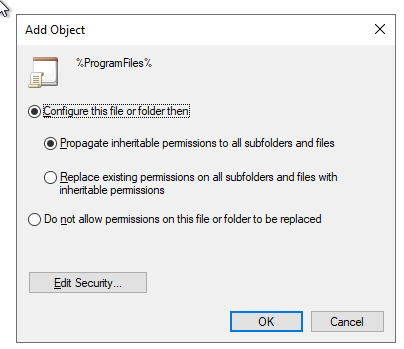
- Go to Computer Configuration > Policies > Windows settings > Security Settings > File System.
- Right-click in the right panel and select Add File....
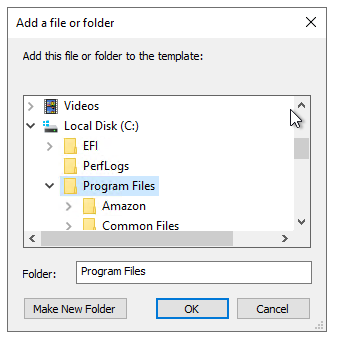
- Select the directory you want to grant permissions and click on OK.
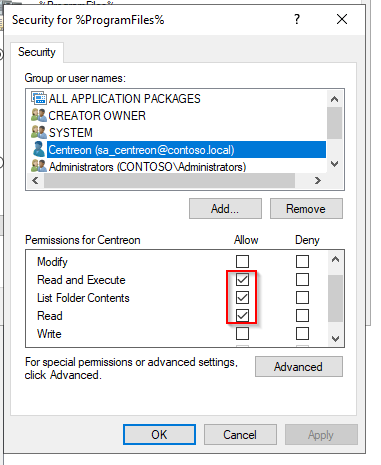
- Click on Add... and select your service user.
- Set the following permissions:
- Read and Execute
- List Folder Contents
- Read.
- Click on Apply, then on OK.
- Select whether you want to propagate these permissions to the subfolders or not.
- Click on OK.
Configure Kerberos on the Centreon server
On the Centreon server, run the following command:
yum install sssd realmd oddjob oddjob-mkhomedir adcli samba-common samba-common-tools krb5-workstation openldap-clients policycoreutils-python -y
realm join --user=administrator <YOUR_DOMAIN>
If you are using Debian 12:
apt -y install realmd sssd sssd-tools libnss-sss libpam-sss adcli samba-common-bin oddjob oddjob-mkhomedir packagekit krb5-user
realm join --user=administrator <YOUR_DOMAIN>
You will be asked to type your domain admin account password.
In our example, it looks like this:

Kerberos ticket
Kerberos authentication tickets expire every 10 hours, disconnecting the centreon-engine user and disabling the authentication. Additionally, Kerberos tickets have a lifetime of 7 days. We will automatically renew the authentication ticket every 9 hours, as well as reinitialize the lifetime every Saturday through a cron job to work around this issue.
You will have to create a "keytab" file associated with your service account to allow connection without a password.
Run the following command, replacing @USERNAME@ with the correct value.
ktutil
addent -password -p @USERNAME@ -k 1 -e aes256-cts
wkt /var/lib/centreon-engine/@USERNAME@.keytab
q
Copy the "keytab" to the home directory of the centreon-engine and centreon-gorgone users and change the "keytab" file's permissions.
Run the following command, replacing @USERNAME@ with the correct value.
cp /var/lib/centreon-engine/@USERNAME@.keytab /var/lib/centreon-engine/
chown centreon-engine. /var/lib/centreon-engine/@USERNAME@.keytab

cp /var/lib/centreon-engine/@USERNAME@.keytab /var/lib/centreon-gorgone/
chown centreon-gorgone. /var/lib/centreon-gorgone/@USERNAME@.keytab
When done, run the following commands to allow centreon-engine and centreon-gorgone to perform the authentication:
su - centreon-engine
kinit -k -t @USERNAME@.keytab @USERNAME@
logout
su - centreon-gorgone
kinit -k -t @USERNAME@.keytab @USERNAME@
Create the cron job, replacing @USERNAME@ with the correct value.
cat <<EOF > /etc/cron.d/kerberos
# ########################################
#
# Cron Configuration for Kerberos
#
PATH=/sbin:/bin:/usr/sbin:/usr/bin

# rewrite file with new cron line
CRONTAB_EXEC_USER=""

############################ Renew ticket
0 */9 * * *  centreon-engine kinit -R
0 */9 * * *  centreon-gorgone kinit -R


############################ Reinitilaize ticket liftime
0 0 * * 6  centreon-engine kinit -k -t @USERNAME@.keytab @USERNAME@
0 0 * * 6  centreon-gorgone kinit -k -t @USERNAME@.keytab @USERNAME@
EOF
Restart the crond process.
systemctl restart crond
Everything is now configured to monitor your Windows servers using WSMAN with a service user account, with an end-to-end encrypted protocol.
Troubleshooting & Known Limitations
Kerberos ticket renewal failing with No credentials cache found
When using the recommended cron job to renew Kerberos tickets, you may encounter the following error:
kinit: No credentials cache found while renewing credentials
This happens because the cron job runs in a minimal environment where the KRB5CCNAME variable is not set,
so kinit -R cannot locate the credentials cache used by the centreon-engine and centreon-gorgone processes.
Diagnosis
First, identify the actual location of the credentials cache for each user:
sudo -u centreon-engine klist
sudo -u centreon-gorgone klist
The output will show the cache path, for example:
Credentials cache: FILE:/tmp/krb5cc_994
Fix — Option 1: Force full ticket reinitialisation every 9 hours (recommended)
Instead of relying on kinit -R (ticket renewal), replace the cron with a full re-authentication using the keytab
file. This avoids any dependency on an existing cache and is more resilient:
cat <<EOF > /etc/cron.d/kerberos
# ########################################
#
# Cron Configuration for Kerberos
#
PATH=/sbin:/bin:/usr/sbin:/usr/bin

############################ Reinitialize ticket every 9h
0 */9 * * *  centreon-engine kinit -k -t /etc/centreon-engine/@USERNAME@.keytab @USERNAME@
0 */9 * * *  centreon-gorgone kinit -k -t /etc/centreon-gorgone/@USERNAME@.keytab @USERNAME@
EOF
Replace
@USERNAME@with your actual service account name (e.g.ServiceMonitor).
Fix — Option 2: Set KRB5CCNAME explicitly in the cron
If you prefer to keep the renewal approach, explicitly define the cache path in the cron:
0 */9 * * *  centreon-engine KRB5CCNAME=FILE:/tmp/krb5cc_centreon-engine kinit -R
0 */9 * * *  centreon-gorgone KRB5CCNAME=FILE:/tmp/krb5cc_centreon-gorgone kinit -R
Warning: Make sure the cache file path matches the output of
klistfor each user.
Disk quota exceeded when monitoring a large number of Windows hosts
When monitoring more than ~100 Windows hosts, you may observe the error Disk quota exceeded during Kerberos
token regeneration. This causes monitoring to stop for all affected hosts.
Root cause
Each Kerberos authentication generates temporary files (credential caches, tickets) in /tmp or in the home
directory of the centreon-engine / centreon-gorgone service accounts. If a disk quota is enforced on these
users, it can be exceeded when many hosts are monitored simultaneously.
Diagnosis
Check the disk quota for the service accounts:
quota -u centreon-engine
quota -u centreon-gorgone
Check for accumulated cache files:
ls -lah /tmp/krb5*
df -h /tmp
Resolution
1. Clean up stale cache files in /tmp:
find /tmp -name 'krb5*' -user centreon-engine -delete
find /tmp -name 'krb5*' -user centreon-gorgone -delete
2. Increase or remove the disk quota for these service accounts (requires root):
edquota -u centreon-engine
edquota -u centreon-gorgone
3. Redirect the Kerberos cache to a dedicated directory with sufficient space by setting KRB5CCNAME
in the environment of the Centreon services.
These service accounts are system users and typically do not require strict disk quotas. It is generally safe to set a higher limit or remove the quota entirely for
centreon-engineandcentreon-gorgone.
How to test your configuration from your Centreon poller
/usr/lib/centreon/plugins/centreon_windows_wsman.pl --plugin=os::windows::wsman::plugin --mode=cpu --hostname=wsman.contoso.local --wsman-scheme=https --wsman-port=5986 --wsman-username='' --wsman-password='' --wsman-auth-method='gssnegotiate'
OK: CPU(s) average usage is 0.84 % - CPU '0' usage: 0.84 % | 'cpu.utilization.percentage'=0.84%;;;0;100 '0#core.cpu.utilization.percentage'=0.84%;;;0;100
This authentication method requires you to use the DNS name of your Windows server, otherwise Kerberos will not allow the connection. Option
--wsman-auth-method='gssnegotiate'is mandatory to use a domain account. As the Centreon system users (centreon-engine and centreon-gorgone) are already authenticated through the kinit command, you don't need to fill up the options wsman-username and wsman-password